Post revisions, as an appealing feature, has been released since the 2.6 version of WordPress. In most circumstances, your content will be auto-saved periodically as the revertible revisions in the event of unexpected computer or browser crashes.
As every single revision is a full copy of your post/page, you are sure to have a few hundred copies of older data if there are already hundreds of posts/pages. With the increase of your revision posts, beyond all doubt, your database will definitely become clunky and slow. For those who need to reduce database size, we would like to explain how to disable revision posts and the past ones in detail. Now, go forward and learn more details.
How to Disable WordPress Post Revisions Manually?
At the very beginning, let’s walk you through how to disable the future post revisions. To do that, you will need to deal with the wp-confi.php file in the root folder of your WordPress. The first thing you need to do is login to cPanel control panel and find out the “File Manager” option located in the “Files” section.
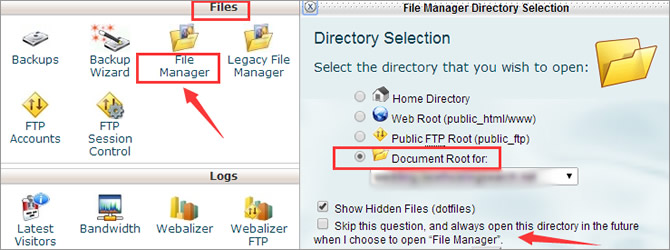
Now, click on this bracketed icon and make a selection of your “Document Root” in the drop-down menu. Of course, you can skip this “Directory Selection” question directly and access the needed folders/directories upon entering the “File Manager” homepage.
define('AUTOSAVE_INTERVAL', 300 );
define('WP_POST_REVISIONS', false );
As is showed, you are expected to enter the wp-config.php file and copy a short line of code into it. Note that, the above code will prolong the autosave interval to 300 seconds, which means that your new article will be automatically saved every five minutes.
Note: If you are going to delete all old revisions saved in your database, you will have to use the following configuration code. Beware that you are required to visit phpMyAdmin to run the below SQL query.
DELETE FROM wp_posts WHERE post_type = "revision";
How to Disable WordPress Post Revisions Using a Plugin?
If you don’t want to deal with coding stuff, there is another handy way to delete the unused revisions. Now, let’s demonstrate you how it is easy to remove all past revisions by the use of a WordPress plugin – Better Delete Revision. Note that, the whole process is included with three main steps without requiring any technical knowledge.
Step 1 – Enable this “Better Delete Revision” Plugin
To do this, you will have to login into your WordPress dashboard and head over to “Plugins” > “Add New” section. After that, search “Better Delete Revision” in this plugin repository and get it installed by hitting the “Install Now” button.
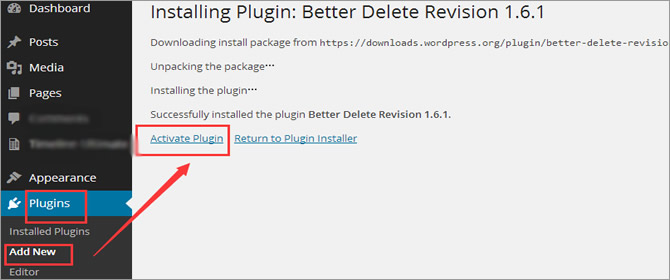
Then, you will be prompted to activate this newly-installed plugin. Just make a hit on this “Activate Plugin” link and you will be brought to a new page where there are a couple of “Installed Plugins.” Till now, you have successfully enabled this “Better Delete Revision” plugin in WordPress.

Step 2 – Check Your Revision Posts
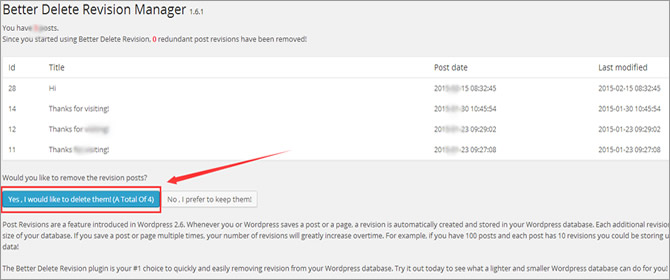
Then, click the “Settings” option and you will be able to check the number of redundant post revisions stored in your WordPress database. Now, hit the “Check Revision Posts” option and take a look at the list of old post revisions as below. Pay attention that, all these selected-out revisions can be removed, and you have the ability to delete them all by choosing the “Yes” option.
Step 3 – Optimize Your Database
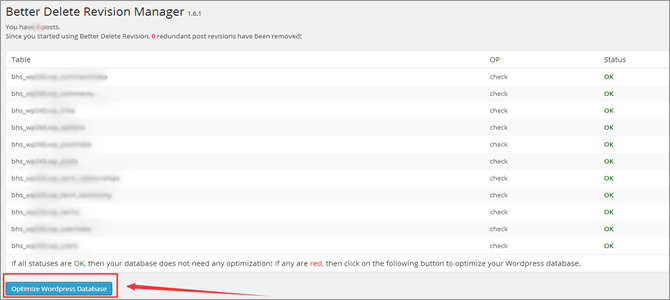
Apart from that, you can also “Optimize Your Database” so as to increase the database query speed. As is showed in the following screenshot, you only need to make a hit on the correspondent button to get it started.
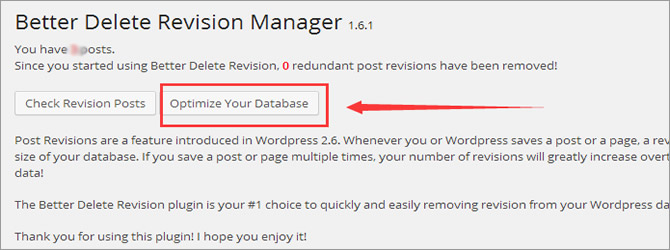
You will be allowed to check the status of all tables so as to ensure whether they are OK or not. If there is any status marked red, you will have to optimize your WordPress database by simply hitting the below bracketed option.
