In line with feedbacks we got from our readers, lots of WordPress newbies are mean to get an idea of ways to customize their dashboard with only few minutes. In consequence, we write this tutorial with an objective to explain specific customization of dashboard by the following step-by-step guidance at length. At last, we also show you how to complete this customization by taking the dashboard of Post as an example. Now keep reading.
Part 1 > Customizing the Dashboard of WordPress
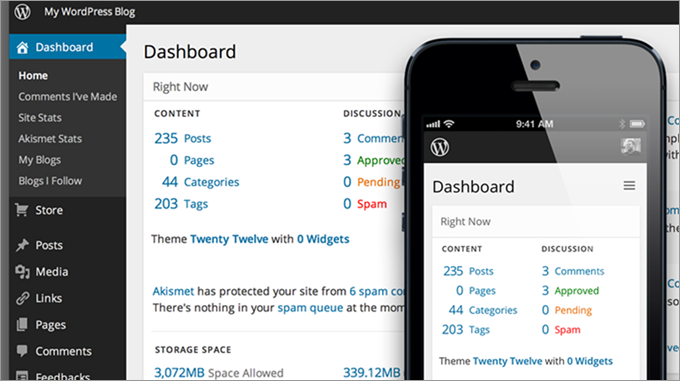
Initially, login your WordPress account. Afterwards, you are bound to see the default WordPress dashboard just like the following picture where you can find various sections including Right Now, Quick Press, Recent Comments, Recent Draft, WordPress Development Blog, Plugins and so forth.
Afterwards, move and rearrange the segments according to the frequency of using and your favor. To be specific, this process can be done through the drag-and-drop function. Simply, click the part you want to move and hold on the mouse button to drag that part to the place where you want to put.
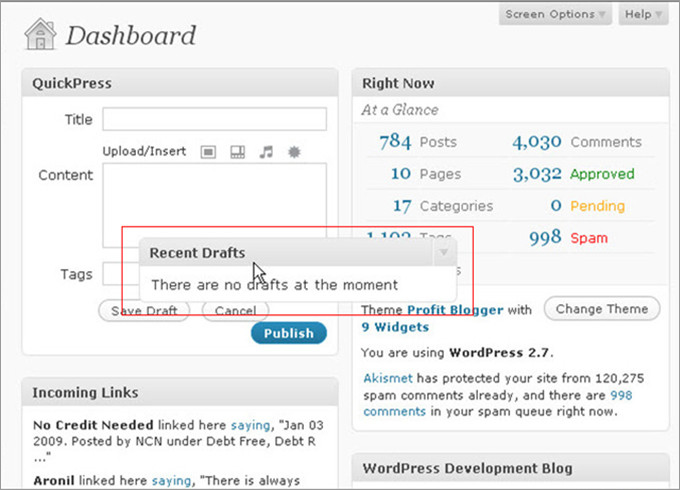
In the upper right of every part, there is a small toggle button with which you are capable of maximizing and minimizing all segments. After clicking the toggle button, you can get a clear graphic interface via the drag-and-drop function. Furthermore, you can do some setting via “Screen Option” where you can have some flexible choices including three main sections: Show on Screen, Screen Layout and Number of Columns like what has been shown in the following image.
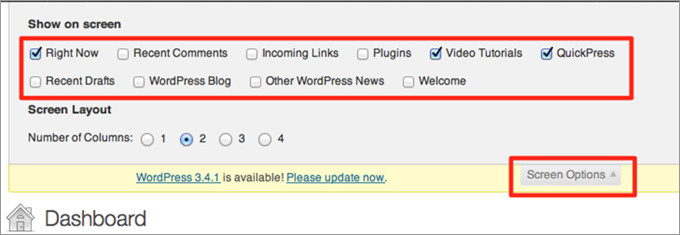
In “Show on Screen”, you are allowed to add or eliminate the elements that you want to show on your WordPress screen. Among these elements, “Right Now” is consisting of the posts, pages, categories, tags, comments and approved, etc. As for “Number of Column”, by default, it is 2 columns. Also, you can choose 1/3/4 columns. Provided that you are sure that some elements are helpless to you, then just uncheck to remove them.
Part 2 > Customizing the Dashboard of Post Editing Page
Firstly, click “Edit” in the drop-down menu of “Posts”. Then, there is a full page of editing where you can do customization of “Publish”, “Comments”, “Post Tags” and “Categories”. Simply, still rearrange their order via dragging and dropping. Then, click the “Screen Option” that includes Post Tags, Categories, Excerpt, Send Trackbacks, Custom Fields, Discussion, Comments, Post Slug and Post Revision as the following.
So, check or uncheck the parts you need or do not need because among them there are some functions you will never use. Moreover, “Number of Columns” comes with two choices for you to see your post including 1 column and 2 columns. With all settings finished, just click the Screen Options to minimize the menu.
In the above step-by-step guidance, we have made a clear description of the customization of the dashboard of WordPress, which completely depends on the style of dashboard you favor.
Related Posts
 How to Enable, Manage & Disable Comments in WordPress
 Beginner’s Guide – How to Use Categories and Tags in…
 How to Display Multi-Column Content in WordPress Pages and Posts
 How to Customize WordPress Theme for Your Own Demands
 Top Tips to Add Google Analytics to WordPress Sites in Minutes
 How to Add Facebook Like Button to WordPress
 How to Use BlueHost Weebly to Build a Website?
 How to Install WordPress Plugins to Add Functionality to Your…