
This is a concise tutorial written with the objective to help webmasters build a website on BlueHost using Weebly which serves as a website builder that enables users to achieve the execution of “drag-and-drop” that means what you need to do is only clicking what you want, drag it to where you want it to be and let it go. After we have personally experienced the Weebly service provided by BlueHost, we have worked out the following guidance.
Now just keep reading and following the step-by-step guidance in below to get a professional website created and published in just minutes.
Step 1 > Subscribe to the Weebly Service on bluehost.com.
Weebly comes with totally 3 verisons including Basic, Professional and E-commerce. Except the package Basic that is free, the rest two charge $8.99/mo and $2.99/mo respectively. Now the good news is that every account you have purchased from BlueHost includes this website builder for free.
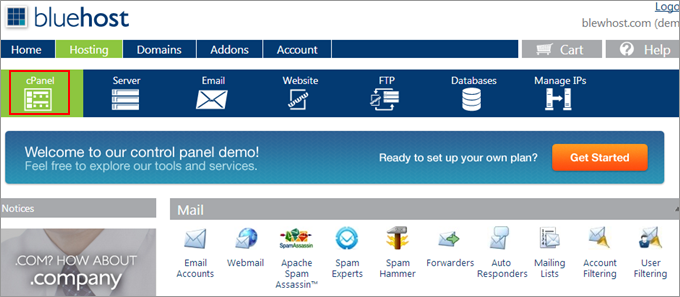
To begin with, what you should do is to login your BlueHost account. Afterwards, click “Weebly Website Builder” among dozens of tools via cPanel. Finally, fill in the addon domain you want and click “Login” after which you have access to Weebly.
Step 2 > Make your website online with Weebly.
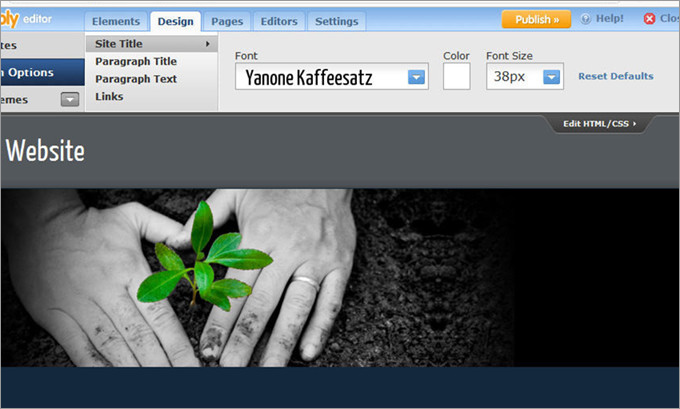
After logging your Weebly, you are bound to see a webpage consisting of two sections like the following picture. The top part is the menu bar including these factors: elements, design, pages and settings. The bottom part is the website itself where you can see these words “This page is empty. Drag Elements here”. The elements part includes 8 parts: paragraph with title, paragraph with picture, picture, title, paragraph, multiple columns, custom HTML and contact form.
The process of building a website is really simple and easy. What you need to do is only dragging what you want to the bottom part. To be specific, drag the title and picture part to the bottom. Then click to edit the content and insert pictures by arranging or deleting them. Once everything looks good and meet your requirements, you can click “Publish” in the upper right part.
Step 3 > Use tools to better your websites.
In addition to the basic creation of a website we have mentioned before, there are other tools that assist you to beautify your site. Specifically, in the design section, there are dozens of wallpapers that can be picked and changed whenever you want. Also, you can click “All Themes” to browse and seek your favorite one.
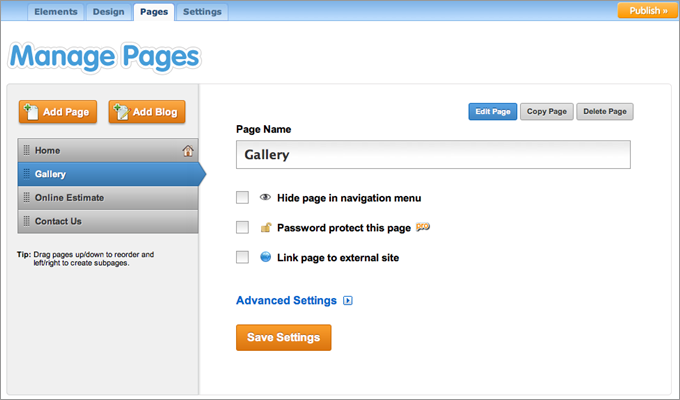
The “Design Option” allows you to change the font, color and size of the text on your website. Besides, the “Pages” enables you to add more pages like the image in below. If you want to blog a page, just click “Add Blog”. Even, you are able to click and drag the pages to change their orders, hide or delete them.
Finally, the “Settings” section let you change the title, edit footer message, and realize search engine optimization by editing keywords to make your site to be more visible for the search engines.
Summary
From the above detailed description, we have showed you how to build a website with BlueHost Weebly. Furthermore, the highly professional technicians of BlueHost also spare no effort to create a series of videos tutorials which show how to use this site builder. If you need to learn more information, you can just visit bluehost.com directly.
If you are impressed by this website builder featured by this company and want to have a try, then you can start by clicking this exclusive promotional link which enables you to enjoy a 44% discount that cuts the price to only $3.95/mo. Moreover, this company also offers other website builders and templates.
Related Posts
 Weebly VS WordPress – Which Is the Better All-in-one Site…
 How to Customize Your WordPress Dashboard within Minutes
 Weebly Review on Blogging Usability & Flexibility
 Weebly VS SquareSpace – Which Is the Better Choice for Creating
 How to Submit Your Site to Search Engines like Google & Bing
 How to Customize WordPress Theme for Your Own Demands
 How to Add an Opt-in Form to Your WordPress Site
 Wix VS Weebly – Which Suits Your Needs Better?