This concise tutorial vividly explains various methods to get WordPress plugins installed with ease. So far, a good many popular plugins are greatly appreciated and applied by a vast majority of WordPress users with the purpose of adding and extending functionality and flexibility to their websites.
These plugins cover lots of types that are designed to satisfy different purposes such as plugins for Membership, Cache, eCommerce, Security, and so forth.
In below, we mainly introduce 3 ways to add plugins to your WordPress website with the least effort and time. These methods include adding plugins to WordPress via dashboard, uploading a plugin through WordPress, and upload a plugin using FTP. Now keep reading to get specific points.
Option 1 > Adding A Plugin via Dashboard
This way is the easiest one to get the plugin installed. Just follow the steps in below to complete the adding.
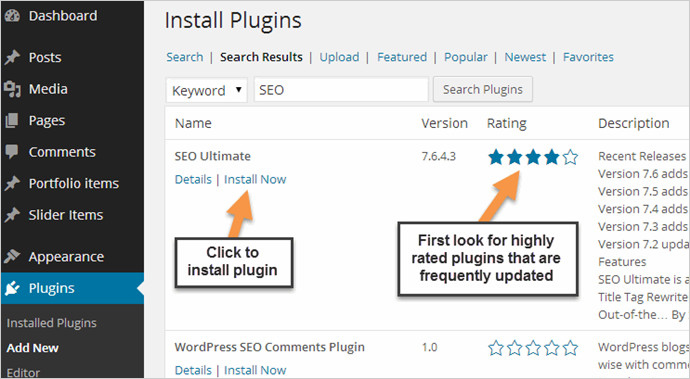
- Login to the dashboard in this order: Dashboard > Plugins > Add New
- Type the name of the plugin in search box and hit enter
- Click “Install Now” after the plugin is searched
- Activate plugin and complete its settings to make sure that it works as what you expect
Option 2 > Adding A Plugin Through Uploading It to Your WordPress
This option is based upon the assumption that you have already downloaded a plugin. If not, before the installation, you need to finish the download.
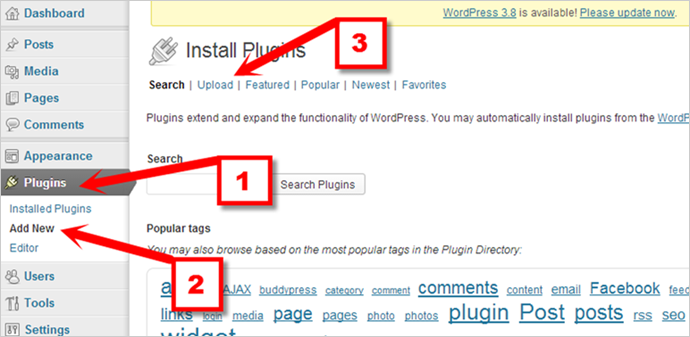
1. Login to the dashboard in this way: Dashboard > Plugins > Add New > Upload
2. Upload the zip file of the plugin
Click “Upload”, then the webpage requires you to install a plugin in .zip format. Afterwards, upload the plugin by click “Choose File” and “Install Now” buttons.
3. Complete the activation and settings of the plugin
Do not take it as granted that the plugin can work in the way you want just after the installation. The essential part is the settings section asking you to pick specific options. Complete it and then go back to the front page to check whether it is competent to work according to your requirements.
Option 3 > Adding A Plugin to WordPress by Means of FTP
This way to accomplish the adding of plugins demands an FTP client. If you have no clear idea of it, then this post is worth reading by coming with a detailed explanation of what is FTP. If you have FTP, then just refer to detailed steps in below.
1. Download a plugin in the community of WordPress
Firstly, visit the official website of WordPress, then seek and download the plugin you favor. Remember to save and extract the zip files in a new folder.
2. Sign in your FTP with detailed information of Host, Username, and Password
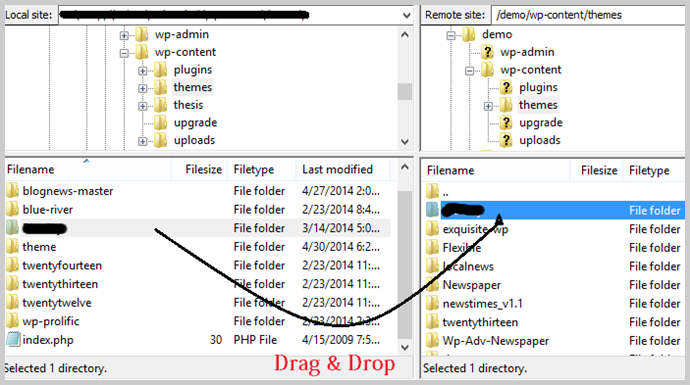
After signing to your FTP, find the file in “Filename” section in this way: “Filename” > “wp-content” > “plugins”.
3. Upload the unpacked files of the plugin
Drag and drop the unpacked files of the plugin to the file we have found before.
4. Come back to the dashboard to do the activation
After uploading the unpacked files of the plugin, come back to the dashboard and refresh the webpage. Then, click “Activate” to get the activation done.
5. Click “Settings” to complete the options
With the adding of a plugin done, click “Settings” where you are capable of choosing the options according to your demands including “Plugin Status”, “Title”, “Description” and so forth. In the end, just click “Update Options” to save the settings.
With the above step by step guidance, you are capable of installing a plugin to your WordPress website within minutes. If you are on the road to pick a plugin among innumerable options available in the community of WordPress, then the posts in below are worth reading by introducing some plugins of high compatibility, customizability and flexibility.
Some Plugins That May Satisfy Your Requirements:
- Best WordPress Youtube Plugins That Make It Easy to Embed and Manage Videos
- Best Instagram WordPress Plugin for Adding Features to Your Blog
- Best WordPress Calender Plugins for Organizing Your Events Easily
- Best WordPress Linkedln Plugins for Linkedln Promotion
- Best SEO WordPress Plugins for Small Business Websites
 How to Allow Users to Login with Email in WordPress
 3 Easy Ways to Add Twitter Feed to WordPress
 How to Add Facebook Like Button to WordPress
 How to Install A WordPress Theme to Get A New Site Look?
 How to Replace Image and Media Files in WordPress Easily
 Beginner’s Guide to WordPress Multisite Domain Mapping
 How to Fix WordPress White Screen of Death Error
 How to Add Favicon to Your Website