With the increasing popularity of WordPress, more and more webmasters, including beginners and professional web developers, start to pay more attention to the function and usage of this blogging platform.
But still, people get easily stuck in some simple tasks. For instance, you may want to replace the old image and media files when these stuff are not very appropriate and out of date in a new circumstance, but only to find replacing images one by one is troublesome and time-consuming.
Fortunately, due to the flexibility of WordPress, now you can achieve many goals without much time and effort. The steps below will tell you how to replace old images and other media files with just 1 click.
Install Enable Media Replace Plugin
First of all, you need to install the Enable Media Replace plugin in the WordPress dashboard. You can see “Add New” under the “Plugin” in dashboard. After pressing this button, a new page will be presented like the picture in below.
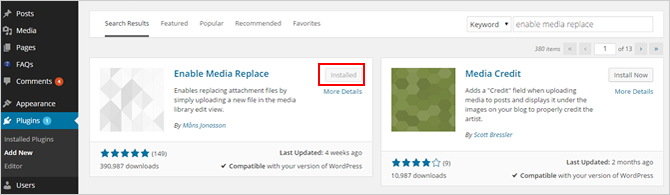
Entering “Enable Media Replace” in the right search box, this plugin will come out. All you need to do is to install and activate it. As long as you activated this plugin, it can configure automatically and you don’t have to do anything else.
Visit Media Library
The next step for you is to visit Media Library in your WordPress admin area. You have to locate the file or image you want to replace. When you are close to the file name with your mouse, you will find out a link named “Replace Media” like the picture showing below.
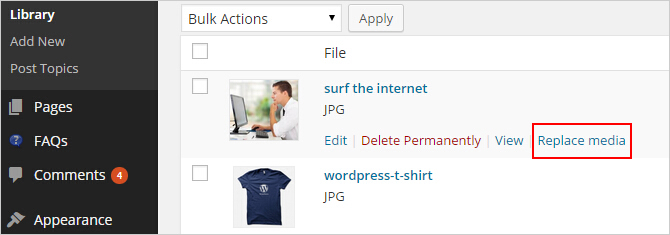
Then you need to click this “Replace media” link to enter a new page. Now you can start uploading your new file from your computer to replace the original one by clicking “Choose File”.
Configure the Replacing Option
After choosing the file you want to replace, here comes with two replacing options you can make. The first one is that you can choose to just replace the file, which means that the name of the attachment will stay the same whatever the file you upload is called. The other one is that you can opt to replace both the file and file name with new ones. Obviously, all links pointing to the current file will be updated to point to the new file name.
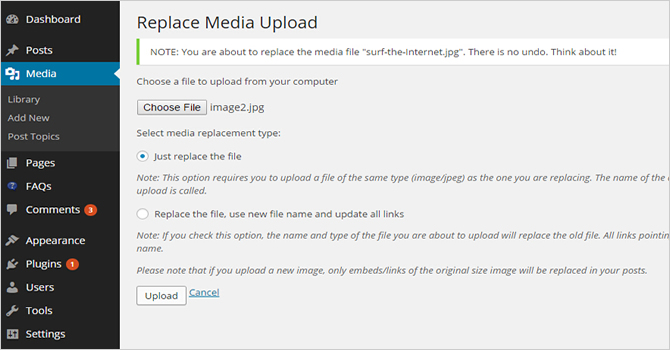
Once you are sure of you option, press the upload button.
Confirm the Replacement
The following work belongs to system. WordPress will upload your new file and the plugin will replace the old one. Of course, if you choose to use both new file and file name, the plugin will pay attention to that according to your order.
When a new media page comes out, you’d better click the update button to make sure the old file you want to replace is removed while the new one is uploaded.
Once everything has been done, you can visit your posts and pages where you attached this media file and find out whether all the old files have been replaced with the new one you just uploaded.
Conclusion
To sum up, replacing image and media files in WordPress is a great way to update your images and websites to match new design of the company. We hope that this article can help you a lot in managing and updating your WordPress site.
When you use large images and media files on a site, you should make sure that your web host has prepared enough space and fast speed. If you are searching for such a host, the companies below might help.
Related Posts
 Beginner’s Guide to WordPress Multisite Domain Mapping
 How to Add and Display YouTube Video Thumbnails in WordPress
 How to Install WordPress Plugins to Add Functionality to Your…
 How to Add a Full Screen Image in WordPress
 How to Embed Video in WordPress Sites to Richen the Content
 How to Add Favicon to Your Website
 How to Install WordPress Manually?
 How to Create a Sitemap for Your Website properly