Favicon, short of “Favourites Icon”, is a tiny image that lies next to the site title in a browser tab. This icon is associated with a webpage and appears in the bookmark list or the address bar next to its URL. To have a favicon is important for site recognition in a web browser filled with tabs. It is a great chance for many web designers to improve user experience so as to expand site branding and usability.
However, there is still a considerable amount of people especially new starters don’t know how easy to use it to stand out in a crowded web browser. Under this circumstance, we will explain how to add favicon in your WordPress site quickly and easily in the following parts. Move forwards and learn the detailed steps.
What a Favicon Looks like?
If you are still confused about what a favicon is, you can refer to the following screenshot. Note that we present three typical places where a favicon is used, including a browser tab, address bar and bookmark list altogether.


How to Add Favicon to Your WordPress Site?
To add a favicon to your current WordPress site is not difficult and consists of three main steps which are elaborately discussed as follows. Now, scroll down and get to the point.
Step 1 – Create .ico Image
At the first place, you need to make an image for favicons in the format of 16×16 pixels. To do so, you can resize an existing image or create a tiny one by going to some Favicon Generator websites like http://favicon.htmlkit.com/favicon/. Here, we would like to create a favicon image by using a photo editing software named as Macromedia Fireworks.
Just open the image editor and make a square image of 200×200 pixels so as to work easily on the image. Once done, resize it into a 16×16 pixels and then save it as a PNG file. To make your favicon normally displayed in most browsers, you’d better convert it into the.ico file in the file name section.

Step 2 – Upload Your Favicon Through a WordPress Plugin
Next, you are required to upload your favicon to site’s root directory through FTP or a WordPress plugin named All in One Favicon. For convenience and simplicity, we will focus on the latter approach. At the very beginning, install and activate the All in One Favicon plugin within the WordPress dashboard. To install this plugin is quite easy, and you can refer to how to install WordPress plugins here.
Once done, you can click the “Settings” button to enter the editing page to upload the created favicon image. As is showed below, there are various options for you to add favicons. You are allowed to add from both front end and back end in your favourite formats. Then, click the “Upload” button lying next to the format to add your favicon.
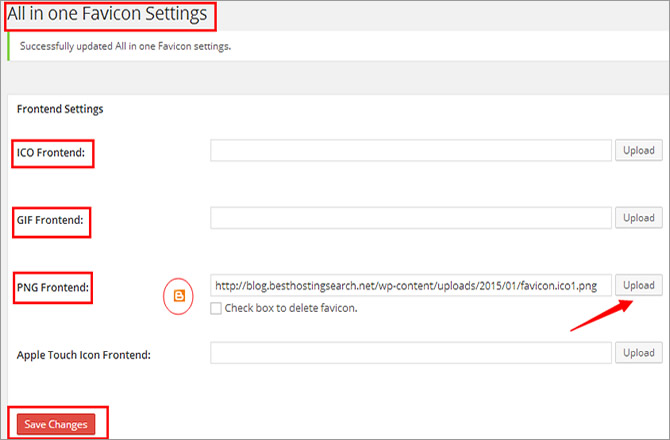
If nothing goes wrong, the uploaded file will be showed next to the URL of your favicon image. In the meantime, you are allowed to delete a favicon by making a click in the check box. Last but not the least, don’t forget to click “Save Changes” button to make it work.
Step 3 – Add Codes in _header.php_ File
In order to make your favicon show up in a browser, you have to edit the page header. Frankly speaking, the best way to edit the theme’s file is through a Child Theme. For the security, you’d better make a copy of the parent theme’s header.php file in advance. To enter the mentioned header.php file, you should follow the root of “Appearance > Editor > Header (header.php)”.

Having done this step, you are requested to add the following code between the head tag.
<link rel="icon" href="https://hostingreview360.com/favicon.ico" />
<link rel="shortcut icon" href="https://hostingreview360.com/favicon.ico" />
Finally, don’t forget to click “Update File” button and refresh the browser. If everything goes right, you will find a favicon next to the site title as is displayed above.
Related Posts
 How to Install A WordPress Theme to Get A New Site Look?
 How to Replace Image and Media Files in WordPress Easily
 Beginner’s Guide to WordPress Multisite Domain Mapping
 How to Install WordPress Manually?
 How to Create a Child Theme for Your WordPress Site
 How to Install WordPress Plugins to Add Functionality to Your…
 How to Disable WordPress Post Revisions
 How to Embed Video in WordPress Sites to Richen the Content