
This straightforward tutorial is aimed at showing you how to add Google Analytics to self-hosted WordPress websites with step-by-step guidance. Being a web analytics service launched by Google in 2005, Google Analytics is free and easy-to-use with which you are capable of gathering detailed information about your visitors, including what they read, how long they have stayed, and what they were searching, even their ages, interests and residences.
Before setting out the process of adding, what you need are a self-hosted WordPress site and a Google Analytics account. Next, just keep scrolling down the screen and follow the tips that enable you to complete this process within minutes.
Step 1 > Login Your Google Analytics Account.
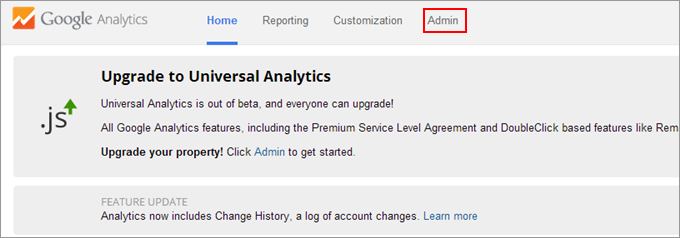
Since Google Analytics is a service from Google, you need to sign up a Google Account. After you login your account, there is a webpage where you can find a navigation menu consisting of 4 sections including Home, Reporting, Customization and Admin. Then click the “Admin” part.
Step 2 > Complete Property Settings.
After you click Admin, you are bound to see a webpage where there are 3 columns consisting of Account, Property and View. Then click “Tracking Info” that is under “Property” and choose “Tracking Code” among 5 options. With this step accomplished, you are able to get specific tracking code for your Google Analytic JavaScript as the picture we have displayed in the following.
![]()
Step 3 > Copy and Paste the Google Analytics Code to Your WordPress Theme
Initially, login your WordPress account and go this way: Dashboard > Appearance > Editor. After you have seen the templates files, just go to the right column where you are capable of locating your header .php file. Then open it and the directory underneath the
tag. Then search the .php file for the closing head tag that appears as . Eventually, copy and paste your Google Analytics code into the file.
To be specific, you may see some codes in your .php header like
and . What exactly you should do is to paste the Google Analytic code between them. Afterwards, click “Update File” to get all the change saved.Step 4 > Check Whether Your Google Analytics Works
With all steps above done, you are now approaching to the final step that is to make sure whether you have successfully completed the process of adding Google Analytics in your WordPress site. Firstly, go back to your Google Account again. Still click “Admin” at the navigation menu and clicking “Tracking Info” by selecting your sites under “Property”.
If your Tracking Status is shown as “Receiving Data”, then it means you have already succeeded in the process of adding Google Analytics to your WordPress sites. Now, you can check the analytics overview of your sites by clicking “Reporting” at the top of the webpage. Please note that Google may take time ranging from 12 to 24 hours to begin providing you detailed statistics.
Related Posts
 10 Best Google Analytics WordPress Plugins Helping Extend…
 and Share Button to a Website") How to Add Google +1 (Plus One) and Share Button to a Website
How to Add Google +1 (Plus One) and Share Button to a Website How to Add Facebook Like Button to WordPress
 A Beginner Tutorial on Google Analytics for eCommerce: The…
 How to Connect Google Drive with WordPress Media Library
 3 Easy Ways to Add Twitter Feed to WordPress
 How to Submit Your Site to Search Engines like Google & Bing
 How to Embed Video in WordPress Sites to Richen the Content