The post How to Set Up Windows Live Writer to Publish Posts on WordPress appeared first on HostingReview360.
]]>This is a Microsoft application designed for desktop blog-publishing, which enables posts to be published from desktop instead of doing so via WordPress dashboard. If you are looking for a tool that raises efficiency of web content management, follow this guide on how to set up Windows Live Writer on WordPress.
What is Windows Live Writer?
Windows Live Writer is a free application developed by Microsoft, used for publishing posts directly from desktop. That is great for blogs or other sites with a large amount of content to update regularly. Featuring WYSIWYG, this tool makes word processing much easier and smoother. The map-publishing and photo-publishing functions make a big difference on media files upload.
Windows Live Writer is 100% compatible with a lot of popular software, like Windows Live Space, WordPress, TypePad, Blogger, and so on. That improves the usability of this great application. And now, it has been translated into 48 different languages to maximize customer satisfaction.
Set Up Windows Live Writer
A brief introduction about Windows Live Writer paves a way for application setup, which may excite you to download this post-publishing tool right away. Access to Windows Live Writer download page and get started to make it available on WordPress. Select a language from the drop-down list and “Download” it.

Open the downloaded file to install Windows Live Writer. There are several programs available to choose from. Leave all options uncheck instead of “Writer” and then click “Install”. Continue the following steps one by one and turn to “Welcome to Window Live!” box since all settings have been done.

If you have not registered a Windows Live ID, click “Sign up” to create an account with personal information. Since an icon like the following screenshot appears on your desktop, Windows Live Writer installation is completed successfully.
![]()
Click to configure Windows Live Writer and select a blog service that you are using. WordPress is included in the option “Other blog service”.

Enter the web address of your blog with WP admin login information as required. The blog is where to accept publishing posts. Click “Next” and wait for a few seconds to set up your blog account. In the mean time, you are asked whether to allow writer to publish a temporary post. Make a decision according to personal needs.

A notice said “Your blog has been set up” indicates successful configuration for Windows Live Writer. Click “Finish” to confirm that you are going to save this blog.

And then, Windows Live Writer editor pops up and invites you to edit & publish the first post.

Take a Good Use of Windows Live Writer
Windows Live Writer editor is easy to understand and handle, even for beginners without any professional skills. Enter a post title in the blank and edit post content on that intuitive dashboard. On the top of this editor, a toolbar including a bunch of functions for customizing fonts, typesetting, hyperlink, image and table.

Move to the bottom of this editor. There are three types of views available for checking text, including Edit, Preview and Source. Edit is used to edit the post and add some other content to it. Preview is where to preview the post and check if there is something improper when publishing this post on your site. Source is the area to check the source code of this post.

The right sidebar enables three modes for post content modification, including links to your site & WP admin, draft & recent posts update and insert options. The given links enables an access to your website and dashboard so as to generate a seamless joint between Windows Live Writer and your site.
Check newly updates via “Open” mode and this is where to show you the number of drafts and recently published posts. The “Insert” mode enables a list of functions to enrich a post, like Hyperlink, Picture, Table, Map, Video, and so on. More plugins are available for you by click “Add a plug-in”. Those methods are great for making readable and increasing the traffic of a blog.

A toolbar below the types of views enables three options for you to set categories & tags and set publish date. Select a proper category to hold this post and set tags for it with comma separated. And then, click the arrowhead icon and expand the list.

Determine whether to open or close comments and whether to allow or deny Pings. Besides, select an author who has made this post. If you want to publish this post to certain visitors, then you should password protect it and only make it public to specific visitors.

Having all settings done, “Publish” this post and view in browser after publishing. The post-publishing requires a few seconds and that depends on your network conditions.

Windows Live Writer Common Issues & Solutions
What to do if you cannot publish a post via Window Live Writer? Here, we collect some common issues that you may run into and give a valid solution for each problem.
Unable to Upload Image
When inserting an image into a post, the issue “The following images cannot be published because the weblog does not support image publishing” arises in some cases. The main cause to that problem is the improper configuration of FTP server, which has serious limitation for external image upload. Resize all images in proper size and avoid using overlarge images. Perhaps, you can upload image via WordPress dashboard > Media and then link it to the newly created post.
Template Detection Error
The “Preview” function enables you to check a post through website front-end. However, since WordPress Live Writer cannot download the active theme, the theme cannot be displayed when you preview this post. The unique way to solve that issue is the use of the following code. Log into WordPress dashboard and go to Appearance > Editor. Add the following lines of code to your active theme. Note that, replace www.yourwebsite.com to your own domain name.
<link href="http://{domain name}/xmlrpc.php?rsd" rel="EditURI" type="application/rsd+xml" />
Suffer Speed Issues
Since everything is stopped short during the process of post editing, you may be upset as if there is no way to go on. Keep calm and go to Start Menu. Find out services.msc and “Stop” it.
New Blog Configuration Error
The message said “Windows Live Writer is unable to detect your blog: server not responding” indicates there is something wrong with the post being configured. Here, making a change to .htaccess file can help you settle a matter with ease. Open your .htaccess file and add the following code to this file.
<Files xmlrpc.php>
SecFilterInheritance Off
</Files>
Summary
The steps mentioned above brief you on a rough idea about Windows Live Writer, in terms of functionality and usability. In fact, more possibilities are available for users who dig into this powerful post-publishing tool. We suggest you to install Windows Live Writer right now and explore it to get more surprises.
The post How to Set Up Windows Live Writer to Publish Posts on WordPress appeared first on HostingReview360.
]]>The post How to Allow Users to Submit Posts to Your WordPress Site at Frontend? appeared first on HostingReview360.
]]>However, the fact is that you can still have submitted-content from the front-end of your WP website without forcing users to fill in a registration form. At this place, we are going to give you a useful outline of how to achieve this goal. Note that, we will take advantage of a simple WordPress plugin named as – User Submitted Posts.
Introduction to User Submitted Posts
User Sumitted Posts is an intuitive and simple WordPress plugin that enables any of your visitors/readers to upload images and submit posts from anywhere on your site. More importantly, this WP plugin comes with a number of useful functionalities. For instance, you can receive email alert for newly-submitted posts and specify the minimum and maximum height and width for uploaded images.
Apart from that, each user-submitted post optionally includes category, tag, post title and much more. Naturally, all submitted posts can be set to any status, such as “Draft”, “Moderate” or “Publish.” Note that, this “User Submitted Posts” plugin requires WordPress 3.7 or higher versions, and its latest version is available for free download through the following URL.
Website URL: https://wordpress.org/plugins/user-submitted-posts/

Install & Activate this Plugin
To allow users/visitor to submit content without registering, you are expected to enable “User Submitted Posts” plugin firstly. To do that, you must login to the WordPress dashboard and move your mouse over “Plugins” > “Add New.” And then, just search “User Submitted Posts” so as to “Install” and “Activate” it later on. If done, you will see this newly-enabled plugin inside this “Installed Plugins” page.

Note: Alternatively, you can also choose to upload a free WordPress plugin like “User Submitted Posts” by the means of FTP client, provided that you are quite familiar with template file. Here is an installation tutorial for your reference.
Allow Users to Submit Posts from the Frontend
As you may suspect, you shall go to “Settings” > “User Submitted Posts” to start customizing this plugin. Within this “Options” tab, there are many configure options for you to select. To name a few, you can decide whether hide or show the post category, user name, post URL, post tags, post title, post images and other fields on the submission form.

Right under the “Show/Hide Form Fields” section, you can also customize “Form Options” based on personal needs. As is displayed in the following image, you will have to specify the “Form Style” and choose the “Assigned Author.” It is recommendable to add a new “Guest User” and distribute all user-generated posts to that “User.” Also, you can set uploaded images as featured image and enable “Auto Publish” option to publish any approved posts automatically.

Besides that, it is possible to use the registered username and URL as the submitted-post author and URL individually. In the “Challenge Question” tab, you can set “Challenge Question” to prevent malicious spam with case-sensitive response. Above all, you have the ability to restrict the uploaded images to certain numbers or sizes.

If you’ve done with all those configurations, don’t forget to press the “Save Changes” button to take effect. To display this newly-created content submission form, you are required to add a new post/page. As always, you can simply enter a post title and embed this short code to your post content.
[user-submitted-posts]
Here is an example of how your USP (User Submitted Post) form will look like:

Allow Users to Submit Images, Links or News Without Registering
If you don’t want to let users to submit entire articles or want them to submit images, news or links with specific descriptions, this “User Submitted” Posts plugin allows you to hide the unneeded fields. Given that you just want your visitors to submit post links, you can navigate to “Settings” > “User Submitted Posts.” Under the “Show/Hide Form Fields” tab, you only need to show the “Post URL” and “Post Title” fields, and hide other fields there.

Although this “User Submitted Posts” doesn’t support widget, you can still add a user-submitted posts form to your sidebar by using this configuration code. Note that, you shall paste the following short code to the functions.php file.
<?php if (function_exists('user_submitted_posts')) user_submitted_posts(); ?>
Recommendable WordPress Plugins for User-Submitted Content
Apart from the above-mentioned “User Submitted Posts” plugin, there are a rich set of options ready for your use. In the following, we will cover several WordPress plugins that let users submit content from the frontend. Access the rest of this tutorial, and may you find the most appropriate one.
Frontend Publishing
Website URL: https://wordpress.org/plugins/front-end-publishing/
As a lightweight plugin, Frontend Publishing allows your registered users to edit, submit and delete their posts from the frontend. In this way, you can accept guest articles/posts without having to give your visitors access to your sensitive admin dashboard.
More than that, this great time saver will automatically filter out the submitted posts that couldn’t meet your website guidelines. From the backend, you can also specify the number of post links and tags, and in the meantime, decide whether nofollow the links applied in author bio or article body.

WP User Frontend
Website URL: https://wordpress.org/plugins/wp-user-frontend/
As a registration form builder, WP User Frontend gives your registered members the ability to edit their profiles and create new posts directly from the website frontend. In the further, it allows you administrator to restrict any user level on accessing the backend of WordPress.
As for the built-in features, this WP User Frontend plugin includes innumerable configurable options. For instance, you can have different profile edit forms and thirteen variations of custom fields. Note that, this plugin requires WordPress 3.3 or higher versions.

Frontend Uploader
Website URL: https://wordpress.org/plugins/frontend-uploader/
This Frontend Uploader offers a quick way for your members to submit media, posts or other blog content. Built on several short codes, this WP plugin will empower you to create a wide variety of forms for posts/pages.
And more, all of submitted content won’t be published without your approval. In terms of industry reputation, this Frontend Uploader plugin has received 4.5 out of 5 stars on the ratings from global guests. For now, its newest version is 0.9 that is free for download from the plugin repository.

The post How to Allow Users to Submit Posts to Your WordPress Site at Frontend? appeared first on HostingReview360.
]]>The post JustHost VS WebHostingHub – Shared Hosting Comparison appeared first on HostingReview360.
]]>Fairly speaking, both of JustHost and WebHostingHub are outstanding web hosting service providers, and they are on par with each other at many aspects. At this place, we would like to analyze and compare the strengths and weaknesses of the two companies from those top-concerned pricing, features, support and performance aspects. Now, move forward and know the editorial ratings on them.
| Rating |  |
 |
|---|---|---|
| Reputation |  |
 |
| Features |  |
 |
| Loading Speed |  |
 |
| Reliability |  |
 |
| Technical Support |  |
 |
| Read More | JustHost Review | WebHostingHub Review |
Price & Money Back Policy
To suit different needs as possible, JustHost is included with up to three shared hosting packages that are priced from $5.99/mo initially. But now, this company offers a cutthroat price of $2.5/mo for anyone clicking through the following promotional link. Note that, it integrates each plan with bountiful freebies, including $50 advertising credits for Facebook, and $100 value credits for Google and Bing.
In comparison, WebHostingHub is full-fledged with three optional plans, among which the basic Spark plan is rated at $6.99/mo on a regular basis. To appeal to users’ attentions, this provider endows a heftily-discounted price of $1.99/mo for purchasers going through the promotional link as follows. As for extras, it supplies up to $200 value free advertising credits in the elite Dynamo plan.
As for the account cancellation policy, JustHost beats down its competitor by offering anytime money back guarantee. That is to say, any unhappy JustHost users who want to cancel their current accounts can ask for a refund without restrict time limits.
Usability & Features
In terms of ease-of-use, both of JustHost and WebHostingHub utilize the industry-leading cPanel to simplify the process of managing domains, databases and other website related files. More than that, they both have easy software installations with one-click script installer.
In the same way, the built-in features are without many differences between JustHost and WebHostingHub. To have a clear look at the similarities and differences, we will make a comparison between the intro-level Starter and Spark plans from JustHost and WebHostingHub severally.
Data Centers & Networks
As above, WebHostingHub has two data centers in East and West coast locations. To ensure incomparable server stability, this company has equipped both data centers with redundant routers that are connecting to the world-class Internet service providers. Plus, it takes advantage of new-interactive power generation system to prevent data loss from a power failure. As below, WebHostingHub keeps an average of 99.99% uptime during our continuous monitoring process.
To deliver ultra-fast connectivity speed, JustHost has been investing heavily on network infrastructures. To be precise, this company deploys multiple fiber entrances and high-availability networks, including load balancers and firewalls. In the past thirty days, it has been tested to average 366ms in the response time, which is a tad bit faster than that of WebHostingHub.
Customer Support
Unlike other providers looking at profit margins and server density as measure of success, JustHost and WebHostingHub take a mission to help users succeed online. Their online technical personnel are more than happy to reply any questions and queries within a matter of several minutes. More importantly, those 24×7-based staffs have been reported to be thorough and attentive in the whole communication process.
Apart from real-person support, JustHost and WebHostingHub also prepare puzzled customers with informative knowledgebase, tutorials and user guides that show the detailed steps to solve common hosting issues. By the way, they also empower clients to contact them through email ticket.
In Conclusion – Both Are Trustworthy
From this JustHost VS WebHostingHub review, both of them are trustworthy hosting solutions that offer rich features and quality support at a well-balanced price. However, WebHostingHub seems to be the better option for the beginners as it allows to host 2 sites on 1 account provides longer full money back guarantee – 90 days.
For the better reference, we use the real customer review statistics of WebHostingHub from the authoritative site BestHostingSearch as below. Their customer satisfaction rate is up to 99.4% in the past 3 years.
The post JustHost VS WebHostingHub – Shared Hosting Comparison appeared first on HostingReview360.
]]>The post How to Use Gmail SMTP Server to Send Email in WordPress appeared first on HostingReview360.
]]>In this tutorial, we’d like to discuss the reasons to use Gmail SMTP server instead of WordPress default functions for sending emails, followed by the procedure to do so.
Why Should Not Send Email from WordPress Site Directly
There are several reasons as to why you shouldn’t use the WordPress site directly for sending emails. Firstly, as WordPress uses PHP to send emails, your emails might land on the spam folder of the recipient; making your email marketing strategy ineffective.
Secondly, many hosting providers set a limit on sending emails to multiple recipients at a time. Due to this, you have to spend a lot of time in repeating sending newsletters to dozens of subscribers.
Lastly, the emails you send through the hosting provider might not reach the recipients due to some technical issues.
Why Should Use a SMTP Server to Send Your WordPress Emails
To start with, the SMTP or the Simple Mail Transfer Protocol is an efficient platform that sends emails through the web using a secure and reliable network. When you use a SMTP server of any mail service that is widely recognized, the scope for errors and minor issues are minimum.
To be precise, if you use the Gmail SMTP server, the probability of your mail being marked as spam is least. Similarly, as Gmail is an efficient mail service, the emails sent by you can hardly get lost but reaches the inbox of your recipient successfully.
Moreover, using a Gmail SMTP server for sending WordPress emails increases the probability of successful mail delivery and minimizes the time delays. Also, you can send emails freely as there are no limits in the frequency of emails to be sent at a time.
How to Install and Configure Easy WP SMTP Plugin to Send Emails from Gmail SMTP
To send emails from your Gmail SMTP Server, you have to install and configure the Easy WP SMTP Plugin. This plugin is recommended because of its high efficiency in performance. Hence, if you are looking forward to executing this procedure, you need to implement the following steps.
First of all, you should download the Easy WP SMTP plugin from an authorized site like WordPress.org to your desktop. Then, upload the file to your WordPress site by digging into the admin panel. Once done, you should activate the plugin to make it work effectively.
The configuration procedure of this plugin can be broadly divided into two sections – configuration of general settings, as well as the testing and the debugging settings. To follow the procedure systematically, you should start with the general settings.
For this, you should dig into the Settings section of the activated plugin and find the General Settings option. Here, you can notice a number of fields, such as the From Email Address, From Name, SMTP Host and Type of Encryption. You need to fill up all the fields with relevant information.

To be precise, you should enter your email address in the From Email Address field. In our example, we enter the address of the Gmail account that we use for sending the emails. In the From Name field, you have to enter the name which can be displayed to your recipients as the sender’s name. The SMTP Host field should be filled up with “smtp.gmail.com” because you use a Gmail SMTP account for sending emails.
Apart from this, the type of encryption should be set to SSL, the SMTP Port must be 465 and the SMTP authentication should be marked as Yes. Once done, you can enter the username that you insert for logging into your mail server, and its password in the Username and Password fields respectively.
Upon the completion, you must hit the Save Changes option to save the configurations. Now, you can move to the second section of the configuration procedure; i.e. Testing and Debugging Settings.

As the name speaks, the Testing and Debugging Settings section allows you to check your configurations by sending a mail. Therefore, you should enter the email address of the recipient in the To field, followed by the subject of the mail (say, Test Mail) in the Subject field and the main text in the Message field. Once you insert the data appropriately, you should click on the Send Test Email to send mail through your Gmail SMTP server.
If the test mail reaches the inbox of the recipient, you have configured the plugin and your Gmail SMTP server successfully.
The post How to Use Gmail SMTP Server to Send Email in WordPress appeared first on HostingReview360.
]]>The post How to Disable WordPress Post Revisions appeared first on HostingReview360.
]]>As every single revision is a full copy of your post/page, you are sure to have a few hundred copies of older data if there are already hundreds of posts/pages. With the increase of your revision posts, beyond all doubt, your database will definitely become clunky and slow. For those who need to reduce database size, we would like to explain how to disable revision posts and the past ones in detail. Now, go forward and learn more details.
How to Disable WordPress Post Revisions Manually?
At the very beginning, let’s walk you through how to disable the future post revisions. To do that, you will need to deal with the wp-confi.php file in the root folder of your WordPress. The first thing you need to do is login to cPanel control panel and find out the “File Manager” option located in the “Files” section.
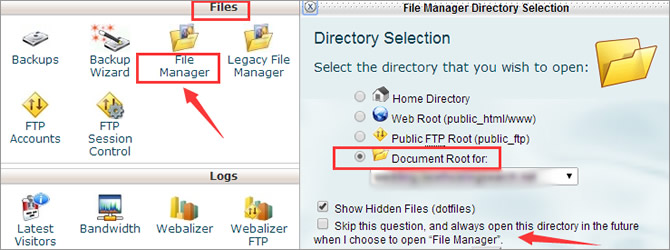
Now, click on this bracketed icon and make a selection of your “Document Root” in the drop-down menu. Of course, you can skip this “Directory Selection” question directly and access the needed folders/directories upon entering the “File Manager” homepage.
define('AUTOSAVE_INTERVAL', 300 );
define('WP_POST_REVISIONS', false );
As is showed, you are expected to enter the wp-config.php file and copy a short line of code into it. Note that, the above code will prolong the autosave interval to 300 seconds, which means that your new article will be automatically saved every five minutes.
Note: If you are going to delete all old revisions saved in your database, you will have to use the following configuration code. Beware that you are required to visit phpMyAdmin to run the below SQL query.
DELETE FROM wp_posts WHERE post_type = "revision";
How to Disable WordPress Post Revisions Using a Plugin?
If you don’t want to deal with coding stuff, there is another handy way to delete the unused revisions. Now, let’s demonstrate you how it is easy to remove all past revisions by the use of a WordPress plugin – Better Delete Revision. Note that, the whole process is included with three main steps without requiring any technical knowledge.
Step 1 – Enable this “Better Delete Revision” Plugin
To do this, you will have to login into your WordPress dashboard and head over to “Plugins” > “Add New” section. After that, search “Better Delete Revision” in this plugin repository and get it installed by hitting the “Install Now” button.
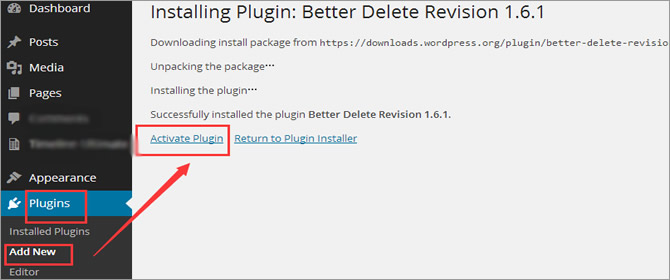
Then, you will be prompted to activate this newly-installed plugin. Just make a hit on this “Activate Plugin” link and you will be brought to a new page where there are a couple of “Installed Plugins.” Till now, you have successfully enabled this “Better Delete Revision” plugin in WordPress.

Step 2 – Check Your Revision Posts
Then, click the “Settings” option and you will be able to check the number of redundant post revisions stored in your WordPress database. Now, hit the “Check Revision Posts” option and take a look at the list of old post revisions as below. Pay attention that, all these selected-out revisions can be removed, and you have the ability to delete them all by choosing the “Yes” option.
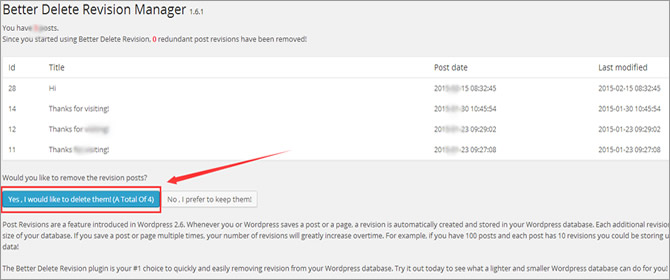
Step 3 – Optimize Your Database
Apart from that, you can also “Optimize Your Database” so as to increase the database query speed. As is showed in the following screenshot, you only need to make a hit on the correspondent button to get it started.
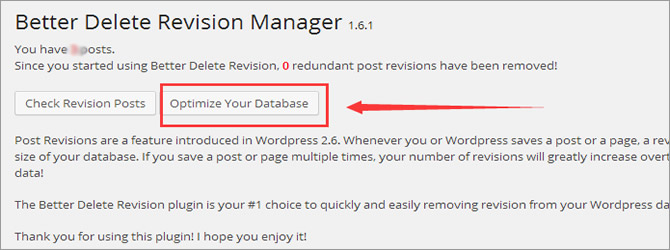
You will be allowed to check the status of all tables so as to ensure whether they are OK or not. If there is any status marked red, you will have to optimize your WordPress database by simply hitting the below bracketed option.
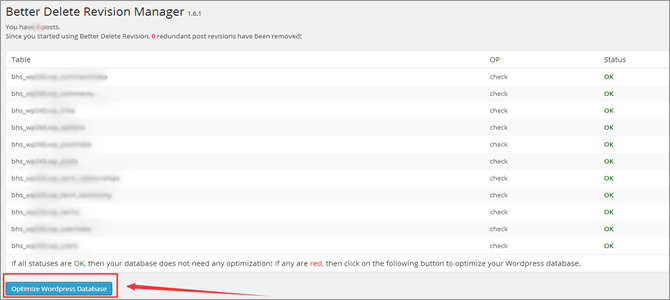
The post How to Disable WordPress Post Revisions appeared first on HostingReview360.
]]>The post How to Set Up WordPress SEO by Yoast appeared first on HostingReview360.
]]>In the further, to setup WordPress SEO by Yoast is not as difficult and troublesome as you may suspect, and instead it requires nothing but your desire to excel. At this place, we would like to demonstrate how to use this plugin to achieve better search placement. Now, keep on reading and get more useful information.
About WordPress SEO by Yoast
Being backed by Joost de Valk and his team at Yoast, WordPress by Yoast so far has over one million downloads with 4.6 of 5 stars on the ratings. Besides that, this versatile plugin has derived a lot of known features from many noticeable plugins like “All in one SEO” and “RSS Footer.” For a better understanding of its built-in features, we will make a list of some significant ones as below:
- Breadcrumbs – that allows you to build an easy navigation for your users and search engines.
- Page Analysis – that allows you to check some simple things that are easily to be forgotten.
- Social Integration – that allows you to integrate the website with Facebook and Google+ sharing tags.
- RSS Optimization – that allows you to tell the search engine where they can find the original article.
- Import & Export – that allows you to export your settings and import them to all of your other websites.
- Meta & Link Elements – that allows you to control which pages that will be indexed by Google search engine.
- XML Sitemaps – that allows you to create XML sitemaps and notify Bing & Google of your sitemaps existence.
Note that, the newest version of this “WordPress SEO by Yoast” plugin is 1.7, which is available for free downloaded from www.wordpress.org.

Install & Activate WordPress SEO by Yoast
As you are probably aware, the first thing you need to do is enable “WordPress SEO by Yoast” in WordPress. According to our installation tutorial, there are three different ways that you can choose to install a free WordPress plugin. In consideration of convenience, we are going to show you the simple ways to add the above-mentioned “WordPress SEO by Yoast” plugin.
In detail, you shall login to the WordPress dashboard and go to “Plugins” > “Add New.” If done, just search “WordPress SEO by Yoast” from this plugin repository, and you will be prompted to “Install” and “Activate” it. After that, you are able to find the newly-enabled plugin on this “Installed Plugins” page. Note that, a new tab saying “SEO” will be added in the left dashboard as below.

Setup WordPress SEO by Yoast
Given that you have enabled this “WordPress SEO by Yoast” plugin, you are expected to move your mouse over this “SEO” tab. As you can see, there are a couple of editing options for you, including “Dashboard”, “Titles & Metas”, “Social”, “XML Sitemaps”, “Permalinks”, “Internal Links”, “RSS” and “Import & Export”, etc. Here, we will cover the basic ones as is described below.
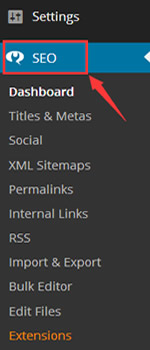
Important to Note: If you are using another SEO plugin other than “WordPress SEO by Yoast” or a third-party theme framework, you’d better transport all your previous data to this new plugin in advance.
General Settings
Just click on this “Dashboard” option and you will be brought to a general settings page as below. In the “General” section, you can choose to “Start Tour” to learn about the use of this plugin quickly. In the meantime, you can also reset your site to default settings.
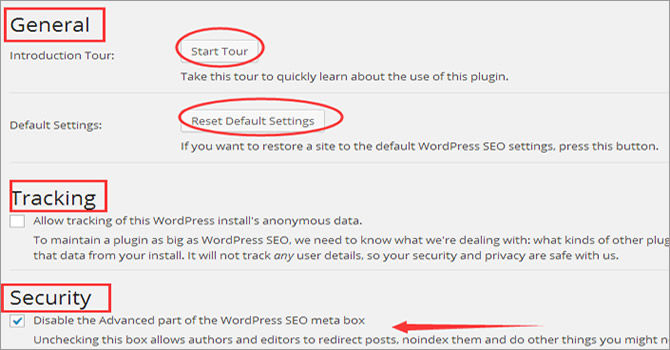
Besides that, there is a “Tracking” option that allows the plugin author to check anonymous usage data. If the data privacy is of great concern to you, you’d better uncheck this option. With the below “Security” option, you will be able to disable the advanced part of your WordPress SEO meta box. It is highly recommendable to check this box so that your editors and authors won’t be able to redirect or noindex posts.
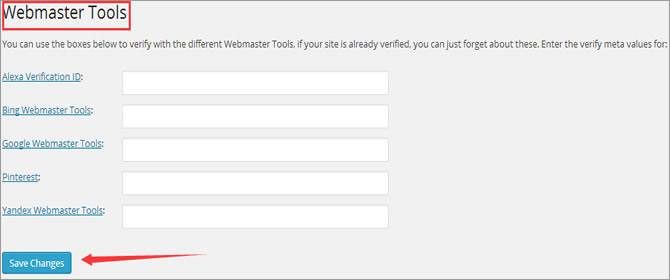
In the last “Webmasters Tools” section, you are allowed to verify with some different “Webmaster Tools” like Pinterest, Alexa, Google and Bing Webmaster Tools. If you have verified your website before, you can skip this step directly. Remember to “Save Changes” ultimately.
Titles & Metas
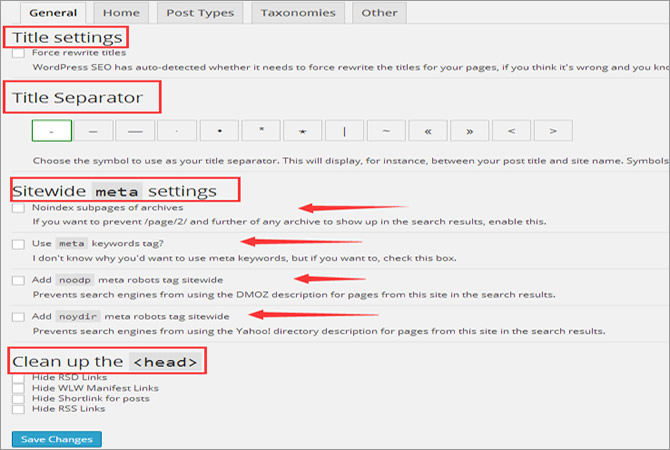
As below, this “Titles & Metas” section is subdivided into several tabs – “General”, “Home”, “Post Types”, “Taxonomies” and “Other.” Within the “General” tab, you will be able to have the following options:
- Title Separator – is where to specify your title separator located between your site name and post title. Note that, your chosen symbol will show in search results.
- Title Settings – is where to overwrite the default post titles and pages of your WordPress. If you are not sure about this usage, you’d better leave this box as it is.
- Sitewide Meta Settings – is where to enable meta keyword tags and add noodp/noydir meta robots. Each option is quite self-explanatory, and you can check the box of your requirement.
- Clean Up the ‘head’ tag – is where to remove some unnecessary code that would prevent Google from crawling and evaluating your website. It is recommendable to check these links especially when you are not using an app or client to update your website.
Within the next “Home” tab, you will be presented with the default title template. Besides that, you have the ability to create meta description and title template based on personal indulgences. As the filled-in website title and meta description will be shown in the search engine results page, the length of your title and meta description should be no more than 70 and 160 characters respectively.

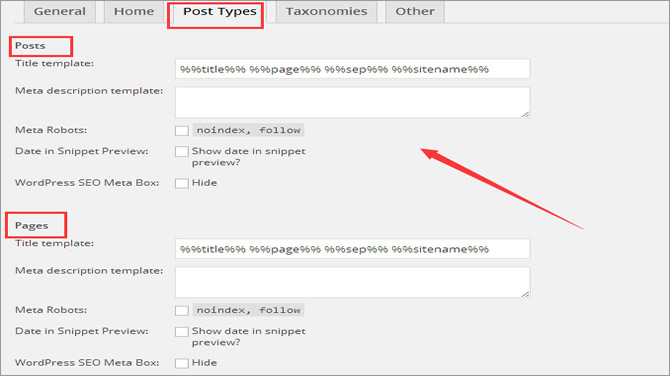
After that, let’s proceed with the “Post Types” tab. At this place, it is possible to define your own custom post type from multiple viable options, including “Posts”, “Pages”, “Media” and much more. And more, each of these post types come with meta description and title template that you need to fill in.
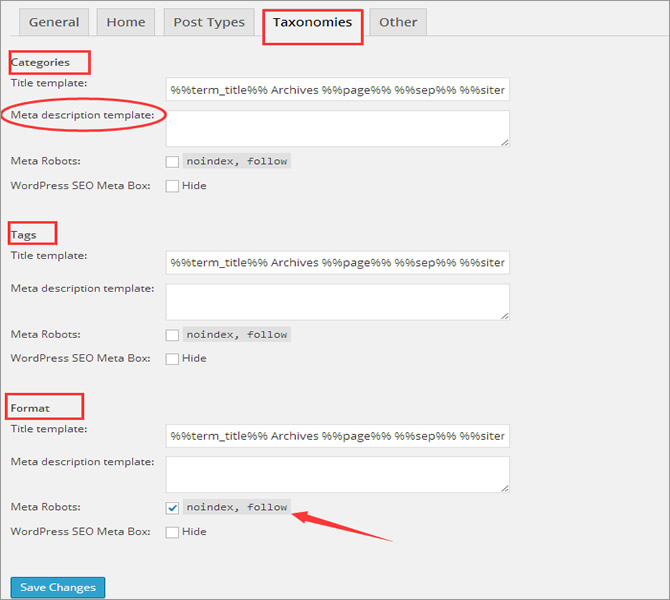
In the “Taxonomies” tab, you will have to customize the above-mentioned meta description and title for your “Categories”, “Tags” and “Format.” To avoid duplicate content as possible, you’d better uncheck the “Meta Robots” option. Note that, in the “Other” tab, you can also create personalized title and description for “Author Archives” and “Date Archives” as well as other special pages like “Search Pages” and “404 Pages.”
Social
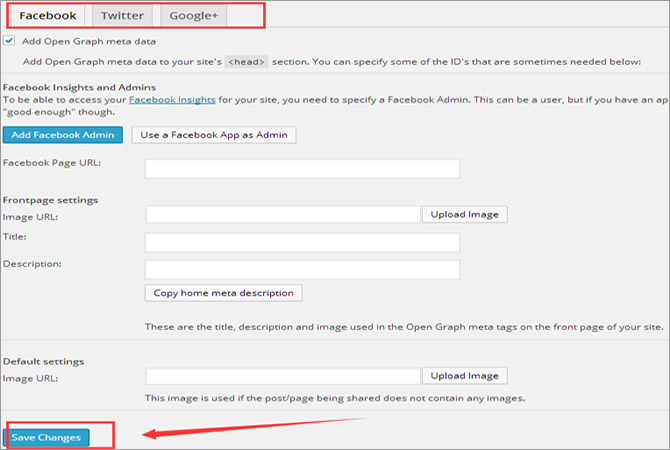
As the most complete SEO plugin, WordPress SEO by Yoast also empowers you to associate your WP website with other social networking platforms, including Facebook, Twitter and Google+. If you already have accounts with those mentioned networks, it’s great to fill in required information so as to improve your website SEO rankings.
XML Sitemaps
Adding sitemaps can be the most effective way to get your website indexed by search engines. Here, you should firstly make sure that the box of this “XML Sitemap option” is checked. And then, you will need to “disable author or user sitemap” especially when you are only using one author blog.
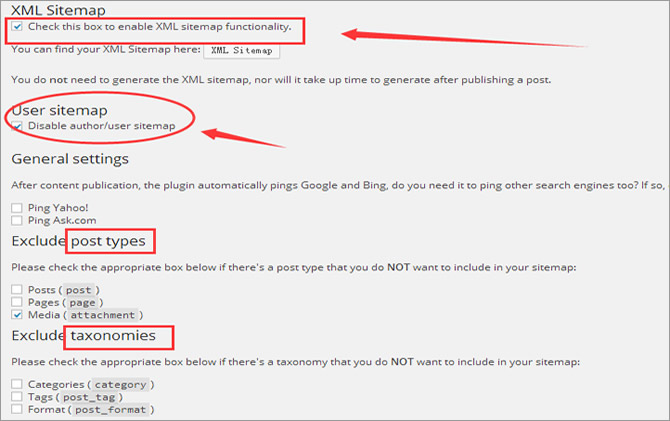
Although this “WordPress SEO” plugin will ping to Google and Bing automatically, you can also choose to ping other search engines like Yahoo and Ask.com. Last but not the least, you shall exclude post types and taxonomies that you don’t want to display in the sitemaps.
Permalinks
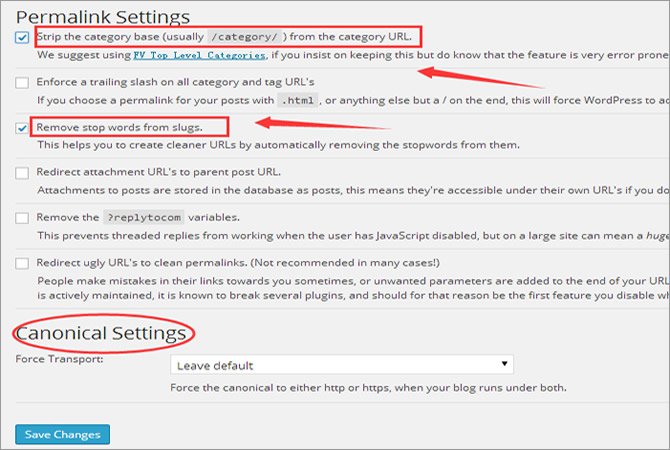
Usually, permalinks refer to the specific URLs of your posts/pages. In this section, you are expected to “strip your category base” in case that the post/page URLs would be in conflict with your category URLs. To create much cleaner URLs, you can “remove stop words from slugs.” At the bottom of this page, you also need to configure the “Canonical Settings.”
In Conclusion
As above, WordPress SEO by Yoast is a powerful plugin that includes all features that you need to get high rankings in the SERPs (Search Engine Results Page). To get more visitors and increase click-through rate is a lifelong pursuit for everyone, and you can get closer to your dream by choosing a reliable and high-performance WordPress hosting, as the following companies.
The post How to Set Up WordPress SEO by Yoast appeared first on HostingReview360.
]]>The post How to Allow Users to Login with Email in WordPress appeared first on HostingReview360.
]]>Login with email is quite helpful and it is beneficial to usability. Because each person have plenty of usernames for different websites commonly, but they do have limited number of email addresses. So, if you know how to log in via email in WordPress, it can be more convenient.
But not everyone knows how to allow logging in via email. So, this tutorial is going to help you out by introducing a plugin which enables you to allow WordPress login through an email address.
Install & Activate the Plugin
There is a plugin named WP Email Login which is easy to use and really useful, but it is not by default included in your plugins WordPress installs. Thus, First of all, you need to install this plugin. To get this done quickly, now you should log in your dashboard and go to “Plugins”. After that you need to click “Add New” in the drop-down list.
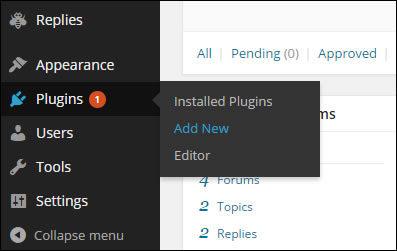
After this step, you will see bold “Add Plugins” on the coming page. Just search WP Email Login with the search box on the upper right of the page and click the “Install Now” button next to the plugin. In that coming page, you just can find “Activate Plugin” in the bottle of the page. Upon activation, this plugin then will work for you.

Login with Email
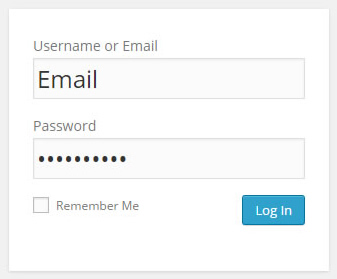
After activation, you may just log out your dashboard and try to log in with your email address. When you are trying to log in via email, you may find the “Username” on the login page from now is changed into “Username or Email” which means that the previous steps work. So, just log in and check out. But you should bear it in mind that the email address should be the address which is filled when you create the account. Otherwise, you cannot log in your dashboard with the wrong email address.
Conclusion
After steps presented above, you can find it quite easy to get the ideas of how to enrich the login function of your site. It may be tricky when you try those steps the first time, but practice makes perfect.
The post How to Allow Users to Login with Email in WordPress appeared first on HostingReview360.
]]>The post How to Add a Weather Forecast Widget to Your WordPress Site appeared first on HostingReview360.
]]>If you plan to do so and have no idea how to enable an accurate weather forecast for your site, then you should follow this guide which helps you settle a matter with wp-forecast plugin. This is a powerful plugin designed for showing weather data on any web pages, posts or sidebar, which has won over 160,000 downloads. Before everything, let’s get started to search for this plugin and install it via your admin.
Install & Activate wp-forecast
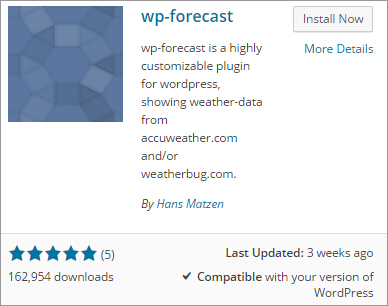
Log into your WordPress dashboard and search for wp-forecast via Plugins > Add New. Pitch on the search result as the following screenshot and click “Install Now”. Activate this plugin since you have successfully installed wp-forecast on your website.
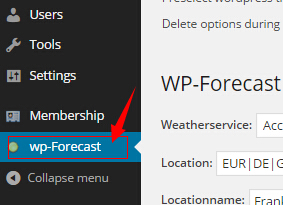
And then, an item called wp-forecast is newly included in the dashboard sidebar.
Set Up wp-forecast
Click wp-forecast option and go to the wp-forecast setting page. First of all, let’s focus on the WP-Forecast Setup mode where to modify some basic settings of your weather widget. In this section, you are required to select a weather service from the drop-down list, which includes AccuWeather and WeatherBug.
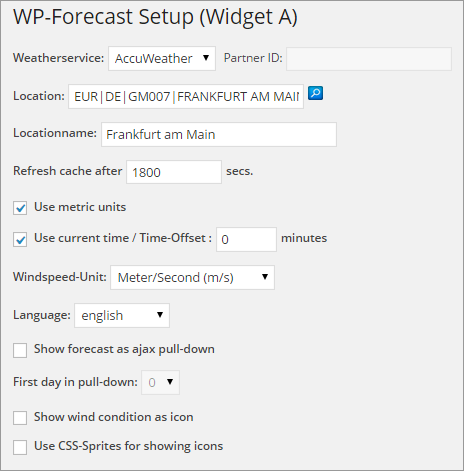
The Location field is where to target your current location so as to help this widget make an accurate judgment of the weather conditions. Click the magnifier icon and enter the correct name of your location in the Searchterm field. “Search Location” and pitch on one of the most suitable search results from the list. And then, name your location properly in the Locationname field.
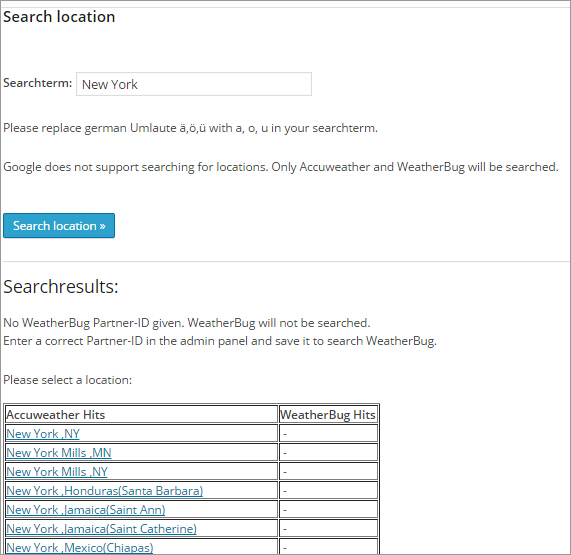
The left options allow you to set how often to refresh each cache and the unit of windspeed. To satisfy the needs of users from different countries, this plugin enables multiple languages for you to choose from. Customize all those options as required and then click “Update options” button to confirm all changes.
And then, move to the Display Configuration mode and this is where to customize the appearance of your weather forecast widget.
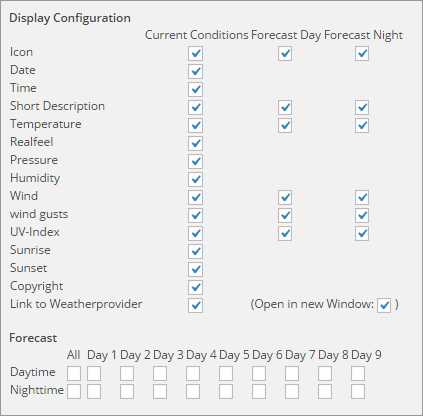
Here, you can determine how many factors should be shown on the widget, such as date, time, temperature, and so on. Besides, you should make certain the time quantum of the weather forecast. Take a good use of those options and create a weather forecast widget with great looking.
Note that, wp-forecast allows you to create as many weather forecast widgets as you need. You can set the number of wp-forecast as needed on the top of this setting page. In addition, the number of available widgets, timeout for weartherprovider connections and preselect wordpress transfer method are all included in this section as the following screenshot.

Display Weather Forecast Widget on Your Website
After creating a new weather forecast widget, you need to showcase it on anywhere of your website according to personal needs. Go to Appearance > Widgets and target the item called WP Forecast via Available Widgets. For instance, we plan to add a weather forecast widget to the dynamic sidebar, so we need to drag & drop the WP Forecast item to the Page Sidebar section on the right page.
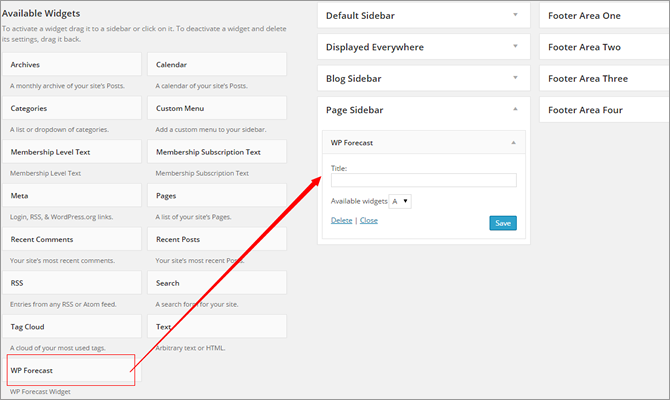
To display more weather forecast widgets on your website, you should move to the bottom of this page and select number of widgets as needed.

Here, we would like to show you the weather forecast widget set by following this step-by-step guide as below.

In addition to wp-forecast, there are many other plugins also available for you to create a great weather forecast widget, such as Weather Underground, Yahoo! Weather Forecasts, My Weather, and so on.
The post How to Add a Weather Forecast Widget to Your WordPress Site appeared first on HostingReview360.
]]>The post How About Make Money Through iTunes Affiliate Program appeared first on HostingReview360.
]]>In the further, the use of affiliate programs has been around for ages, and it’s a win-win situation for both companies and individuals. At this place, we would like to throw a spotlight on the most popular example of affiliate programs – iTunes Store. Note that, we would also discover how to earn additional revenues by taking advantage of this kind of affiliate program.
What Is iTunes Affiliate Program?
As you may know, the Apple’s iTunes Store is such a place where TV, music, applications and movies are sold from virtual storefronts. Besides that, it has been revolutionizing the whole music and smartphone industry with its app ecosystem.
When it comes to iTunes affiliate program or affiliate marketing, it is a kind of method used to promote business and acknowledge purchasers who have been referred to their stores through a third-party. As for an affiliate in this program, he will be rewarded for each subscriber, visitor or customer brought through his efforts.
How Does It Work?
 Every time when someone clicks on the”affiliate” link on your website to get into the iTunes Store and buys something there, you are promised to earn a commission on that referred sale. In detail, as your “affiliate” links to the iTunes Store always include a 24-hour “cookie window”, you will get paid for any successful purchase within your 24-hour “cookie window.” Note that, you should make sure that your link is the last one on that purchaser’s device.
In the further, iTunes affiliate program usually pays an affiliate about 5% of the sales price on each purchase. Considering that an average iTunes merchandise costs up to $9.99, it takes much time and efforts to benefit a lot from this from this “passive income.” However, the good news is that you don’t have to pay an aggregator any commission to get your products (like album or record) sold on iTunes.
Why Need to Use It?
Believe it or not, affiliate links are widely spreading throughout the Internet, and you may unknowingly click various affiliate links every day. Thanks to the APIs (applications and programming interfaces) and cloud technologies, it is possible and quite easy to put affiliate links online and track purchase referrals automatically.
To make use of this kind of free affiliate marketing, you can simply copy and paste links to iTunes store, or better yet create auto-generated links by yourself. As for more details, you can refer to the following steps.
How to Make Money from Your Website by Using iTunes Affiliate Program?
In this section, we would like to brief you on how to get started with the iTunes affiliate program. Now, let’s move on and get down to the point.
Step 1 – Sign Up for the LinkShare Network
Needless to say, the first thing you need to do is to become an affiliate of iTunes. As Apple now has outsourced its affiliate marketing campaign directly to another company named as LinkShare, you will need to register with LinkShare firstly. Note that, the mentioned LinkShare will take charge of your relationship with iTunes Store, and in the meantime, offer you a lot of tools used to create links. Click this link to sign up for the LinkShare network.
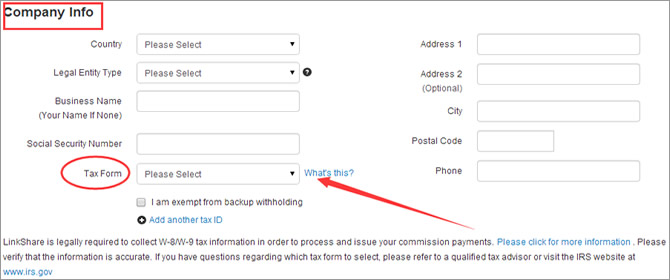
First of all, you will have to fill in your company information, such as “Country”, “Business Name”, “Company Address”, “Social Security Number”, “Postal Code”, “Phone” and much more. Pay attention that you should also fill in your tax information like “Tax Form” that starts with “W-9″ for all US-based publishers.
Below that, you will be prompted to fill in your “Contact & Account” information. As you can see, you should fill out your “First Name”, “Last Name”, “Email”, “Username”, “Password” and “Security Question & Answer.” For security, you’d better make the password as strong as possible.

Apart from that, you shall tell your “Primary Website” information, such as “Website Name”, “URL”, “Short Description”, “Page Views”, “Unique Visitors”, “Business Model” and so on. This section is designed to verify your site’s real condition. To put affiliate ads on your own site, you’d better not include anything as below.
- Information about any illegal activities that violate the current laws, including “adware”, “spam” and “spyware.”
- Information about discrimination based on disability, religion, race, sex, nationality, age or sexual orientation.
- Information about violent, hateful, offensive, sexually explicit or political related content.
By the way, you would specify your “Payment Threshold”, “Language Preference” and “Email Subscriptions.” To put an end to your information certification, you should ensure that you have read and checked the last “Membership Agreement.”
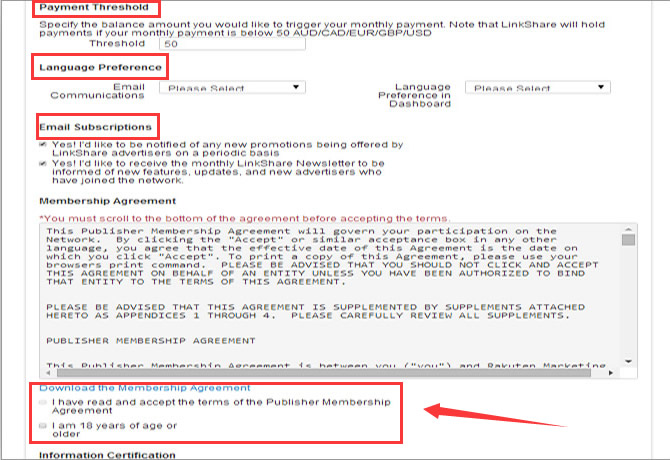
Once you are accepted by LinkShare, you will be allowed to login to your account to get your ads code and select your preferred affiliate programs like iTunes Store.
Step 2 – Register with iTunes Affiliate Program
As the title implies, you should then become a member of iTunes affiliate program. Just go back to the admin interface of LinkShare and click the “Programs” tab to search your “iTunes.” Once done, you will be able to find out the iTunes Store option. Make sure that you have read the given “Terms and Conditions” before you decide to “Apply to all checked programs.”
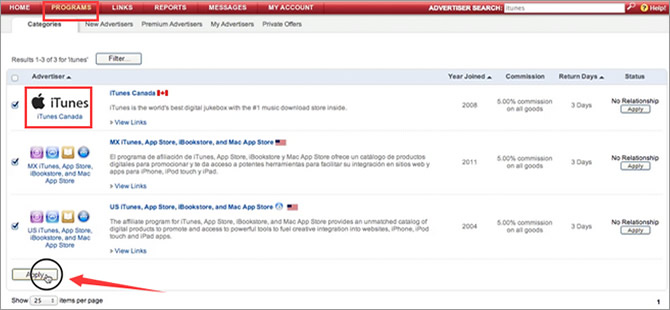
Usually, it will take several days to get approval from iTunes, and you have no other choice but wait patiently during this period. Note that, you will definitely receive an email notifying whether you are qualified to be an iTunes affiliate. Beware that, there still are some types of websites that won’t be accepted from Apple.
Step 3 – Embed Links to Your Website
And then, you only need to add affiliate links to your site for now. Just enter the “My Advertisers” tab and open the drop-down “Links” list. As below, there are several selectable options for you to choose from.
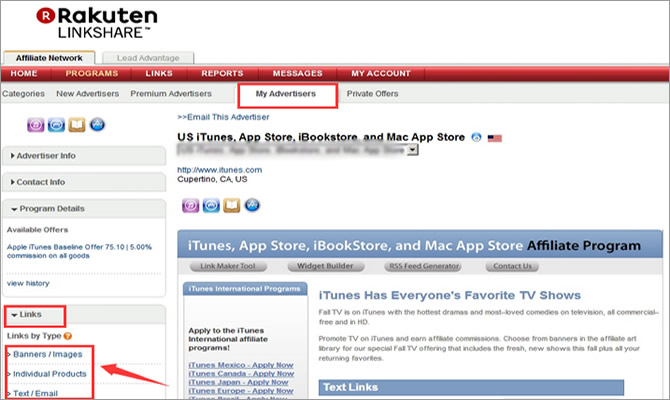
Pay attention that, the “Text/Email” option allows you to create affiliate links in your site’s text or email listings. And the “Banners/Images” option allows you to use generic ads on your website in the form of colourful images. Of course, there are more possibilities preserved to be explored.
Step 4 – Optimize Website for Better Performance
This step is of great necessity especially when you want to make a big difference afterwards. Optimizing your website can not only increase your website’s traffic, but also can boost the click-through rate to the mentioned iTunes Store. Note that, you can also choose to sell your own works on iTunes.
The post How About Make Money Through iTunes Affiliate Program appeared first on HostingReview360.
]]>