
Do you ever find that the built-in categories and tags are not enough to sort and group a series of entries? Do you ever want to add additional fields to enrich your post content in a different looking way from a “well-designed” post or page? If this is the case, then you will need to make use of a custom WordPress taxonomy.
Frankly speaking, the mentioned custom taxonomy is not a technically-focused term, which can be comprehended even by new starters. To have a much clear and solid understanding on this WordPress taxonomy, let’s have an overall look at the definition of it and how to use it as well.
What Is WordPress Taxonomy on Earth?
Taxonomy, as a commonly-seen word in biology, refers to the science and practice of classification. Derived from this biological classification system, the taxonomy in WordPress is a great way to group posts and many other custom post types together. In this way, a custom taxonomy makes it possible to structure a great deal of content in a well-organized and documented way.
As is often the case, there are four default taxonomies in WordPress, including “Categories”, “Tags”, “Links” and “Navigation Menu.” In terms of different functionalities, taxonomies are classified into two forms – “Hierarchical Taxonomy” and “Non-Hierarchical Taxonomy”. Usually, a category and tag can be the most common examples of those hierarchical and non-hierarchical taxonomies respectively. In the following part, we would like to teach you how to create a custom taxonomy beyond those categories and tags to sort the post content.

How to Create a Custom Taxonomy on WordPress Site?
When it comes down to how to create a custom taxonomy, there are two different ways available for you. That is to say, you can choose to embed a series of script codes into the theme’s functions.php file or to use a fully-fledged WordPress plugin. This is totally of personal preferences.
Automatic Approach
Here, we would like to talk about the automatic approach first of all. Honestly speaking, to create a custom taxonomy through a plugin allows you to create and manage your own post types and newly-added taxonomies without a lot of troubles. As there are large amounts of plugins on the market, we take a plugin named Simple Taxonomy as example in below.
Install & Activate Simple Taxonomy
First and foremost, you should firstly go to “Appearance” > “Add New” so as to research and install this intuitive “Simple Taxonomy” plugin. Once installed, you will be prompted to “Activate Plugin” in order to make it work. And then, you will be automatically transferred to an “Installed Plugin” page where you can find out this “Simple Taxonomy” plugin. In the meantime, there are two selectable options – “Deactivate” and “Edit” – that you can use to delete and make settings on this newly-installed plugin.
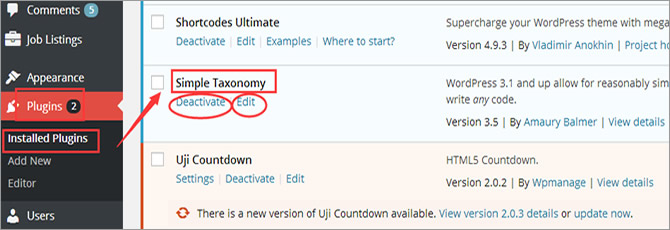
Note: For some people who still feel confused about those introduced steps, there is an informative plugin installation tutorial to refer to.
Create a New Taxonomy
To do this, you are required to go to “Settings” > “Custom Taxonomies” firstly. If done, you will be asked to create a name for your own taxonomy in “Add a new taxonomy” section. Pay attention that all characters of your name should be lowercased without any weird symbols.
And then, you can decide whether this custom taxonomy is hierarchical or non-hierarchical by choosing “True” and “False” options accordingly. In another word, if you choose “True”, you are able to add a category-like taxonomy, with which you can create a child and parent term. On the other hand, if you choose “False”, you are capable of creating a tag-like taxonomy.
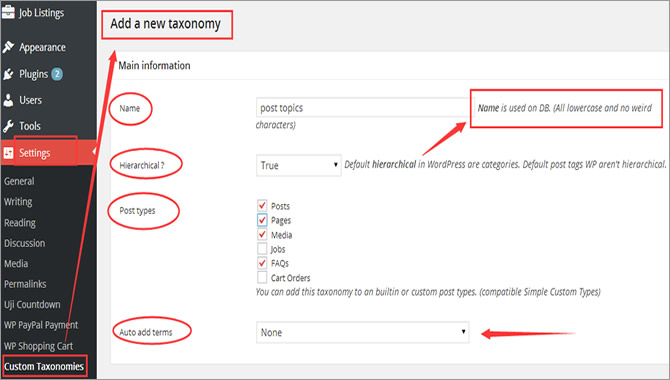
Having done with those mentioned steps, you will be prompted to add this newly-created taxonomy to your existing post types, such as “Posts”, “Pages”, “Media”, “Jobs”, “FAQs” and “Cart Orders”. Next, you should specify whether add auto-terms from four available options – “None”, “Content”, “Excerpt” and “Content and Expert”.
Set Visibility for Your Custom Taxonomy
As is showed in below, you can also decide whether your taxonomy queries can be displayed on the front page of your WordPress site. And you are able to enable and disable this functionality by choosing “True” and “False” respectively.

Specify Your Translations Wording
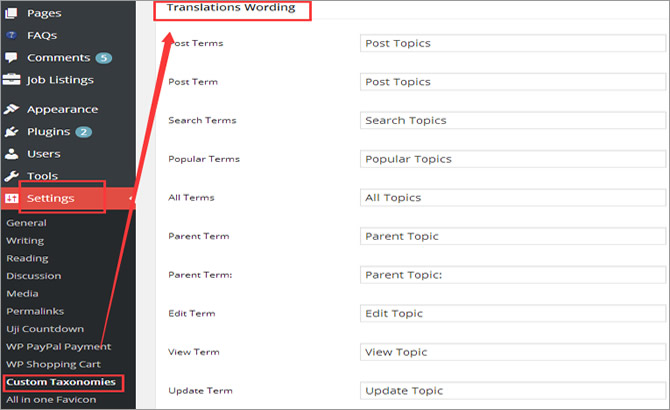
Here comes the utmost important part- “Translations Wording”, which helps WordPress translate user interface for the newly-created taxonomies. Given that you make a new taxonomy named as “Topics”, then you will need to specify the following translations wording as follows.
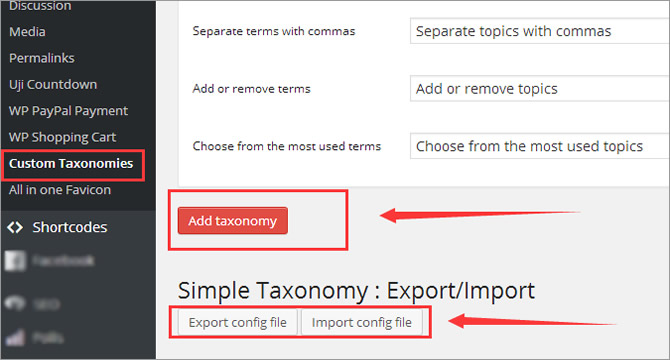
After that, you will need to click on “Add taxonomy” button to take effect. By the way, you are also allowed to “Export config file” and “Import config file” as is showed in the following screenshot.
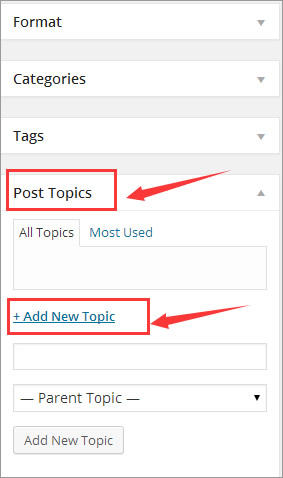
Note: If nothing goes wrong, you will notice a new custom taxonomy has been placed on the previously-specified area. As is displayed in below, our “Post Topics” appears as a sidebar where a lot of new topics are ready to be added.
Manual Method
If you prefer to write and paste codes to perform your own custom taxonomy, here are some recommendable steps. Note that, if you are not very skilled in perceiving and managing CSS and HTML codes, you can directly skip this section.
To create a hierarchical custom taxonomy like “Categories”, you shall go to your theme’s functions.php file and then embed those following codes to the end of this file.
add_action( 'init', 'build_taxonomies', 0 );

function build_taxonomies() {
register_taxonomy() {
'color',
'post',
array('hierarchical' => true,
'label' => 'Color',
'query_var' => true,
'rewrite' => true ) );

register_taxonomy(
'size',
'post',
array('hierarchical' => true,
'label' => 'Size',
'query_var' => true,
'rewrite' => true ) );

register_taxonomy(
'style',
'post',
array('hierarchical' => true,
'label' => 'style',
'query_var' => true,
'rewrite' => true ) );
}
Highly-Recommendable Taxonomy WordPress Plugins
Having successfully created a custom taxonomy on a WordPress site, you still need to use some developer-friendly taxonomy plugins so as to extend site visibility and functionality. In this case, we pick out those recommendable options in the following list. Note that, all those plugins are free to download on www.wordpress.org.
- Custom Taxonomies Menu Widget – It helps you to build a well-arranged menu for your custom taxonomies and those related terms through widget control panel. In the further, this customizable plugin can show the taxonomy name as a title and hide associated terms as a hierarchy.
- Beautiful taxonomy filters – It enables you to have a complete solution to add filtering on the basis of taxonomy tags, terms and categories. More importantly, this good-looking plugin supports multiple languages ranging from English, Swedish to Spanish and Dutch.
- Taxonomy Images – It empowers you to associate uploaded images stored in media library with tags, categories and custom taxonomies. More than that, this kind of WP plugin can work great with all terms of a given taxonomy.
- PS Taxonomy Expander – It allows you to add easy-to-use tags, categories and custom taxonomies to any editing pages. Besides, this plugin can turn your taxonomy check box into a radio button with hierarchy like categories.
In Conclusion
In any of these cases, it is recommendable to choose a reliable and powerful WordPress hosting solution that offers you convenience and direction on your way to success. In the following, we select out some outstanding ones which include InMotion, BlueHost and GreenGeeks.


