
What can you do if you are locked out of your login account? Many webmasters may have come to such embarrassing situation and have no idea how to deal with this big issue. In fact, there are many reasons forcing you to add a new admin user to your WordPress database, such as hack attacking, password lost, user account deletion, code error, and so on. Anyway, you long for a valid method that can help you reach the goal.
Fortunately, the following guide on how to add an admin user to a WordPress database via MySQL can make a big difference for you. There are two methods valued in this post. The first one is to add lines of SQL queries to your database while the other one is to insert the new admin user information into database directly.
All processes are completed via phpMyAdmin, which is the greatest tool for database management. You are allowed to download & install phpMyAmin manually or rely on a control panel that features this powerful tool, like cPanel. Go through the following steps and then make a hit!
Add Admin User Using SQL Queries
The first method to add admin user is to make use of lines of SQL queries, which enable you to customize the username, user email, password, and other information flexibly. You just need to add the following SQL queries to your database and then modify the values if needed. Note that, we would like to finish all steps via cPanel.
Go to cPanel > Databases > phpMyAdmin and pitch on your database name from the left sidebar. However, if you forget about which database is the one to be modified, you are required to go to Files > File Manager and pitch on the domain being used. And then, seek the wpconfig.php file out and “Edit” this file. Once opening the wpconfig.php file, you need to target the code as below.
define('DB_NAME', 'userna5_wp123');
Note that, the “wp123″ is actually your database name. And now, go back to phpMyAdmin and select your database name correctly from a list of names. Here is an interface that enables 10 tabs and a list of tables for you. Click the “SQL” tab.
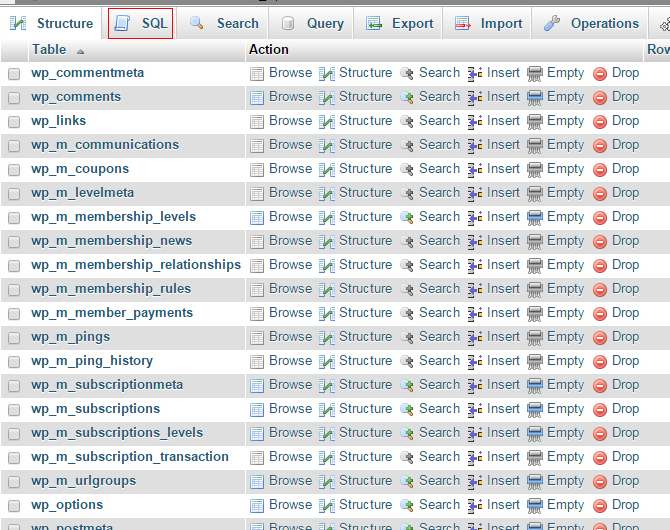
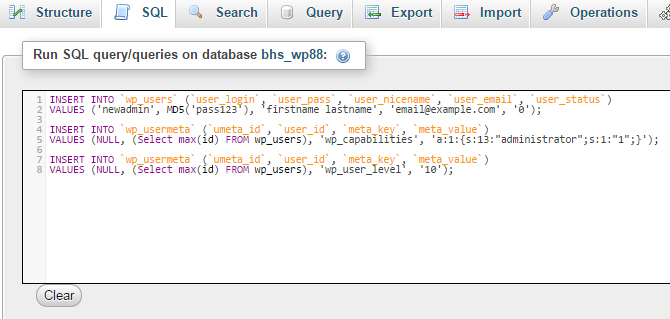
A blank that allows you to copy and paste lines of SQL queries are available for you. Add the following SQL queries to this field.
INSERT INTO `wp_users` (`user_login`, `user_pass`, `user_nicename`, `user_email`, `user_status`)
VALUES ('{login name}', MD5('{password}'), '{display name}', '{email address}', '0');

INSERT INTO `wp_usermeta` (`umeta_id`, `user_id`, `meta_key`, `meta_value`)
VALUES (NULL, (SELECT id FROM wp_users WHERE `user_login` = '{login name}'), 'wp_capabilities', 'a:1:{s:13:"administrator";s:1:"1";}');

INSERT INTO `wp_usermeta` (`umeta_id`, `user_id`, `meta_key`, `meta_value`)
VALUES (NULL, (SELECT id FROM wp_users WHERE `user_login` = '{login name}'), 'wp_user_level', '10');
Note that, you are required to replace the values including {login name}, {password}, {display name} and {email address} to specific information of the newly created admin user. Then click “Go” button to confirm all settings.
Since you have all settings done, you are required to check if the user admin is valid for your website. You can log into your wp-admin with the new username and password. If you are able to access to your website backend, then you have created the new user account successfully. If not, you should go back to the “SQL” tab and check if there is something wrong with the information.
Insert Admin User Information via phpMyAdmin
If you are unfamiliar with coding stuff and confused about lines of code mentioned in the previous method, then inserting admin user information via phpMyAdmin directly is created for you. Since cPanel is a user-friendly control panel and features phpMyAdmin, we are going to complete the following steps via this trust-worthy control panel.
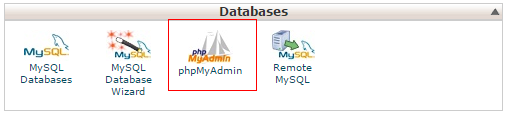
Log into cPanel with your account and pitch on Databases > phpMyAdmin. Click “phpMyAdmin” icon and wait for seconds to access to phpMyAdmin interface.
Select your database from database drop-down list in the left sidebar. A bunch of database information is listed in an interface which enables 10 tabs for you. Search for the table “wp_users” via the Structure tab and then click it.

There are some tabs available for you on the top of this page. Go to the Insert tab and add the new user information to it. Here is a list of fields to be filled out as what we have shown you as below.
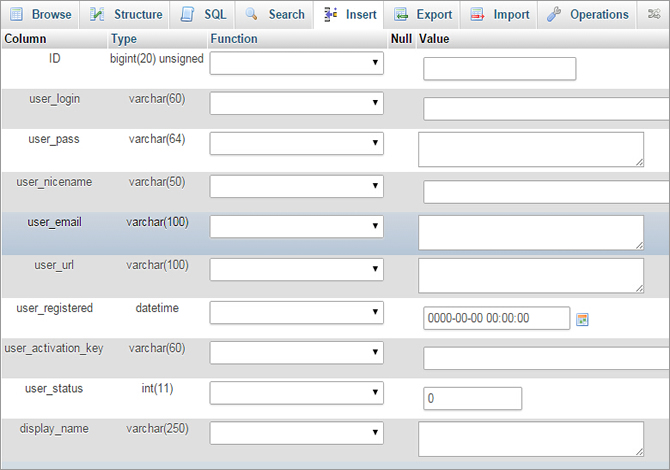
- ID – You can leave out this option because it will be generated automatically since you confirm all settings later.
- User_login – this is where to set the username that is used to log into your WordPress website.
- User_pass – Obviously, the place to set your admin user password. Note that, the password should mix numbers with letters and specific symbols; therefore, no one has the ability to break such strong password. We suggest you to reset admin password regularly so as to improve the security level.
- User_nicename – Set a nickname for the new user admin.
- User_email – Enter an email associated with the newly created user correctly.
- User_url – Fill out the URL linked to your website.
- User_registered – Select the date when the new user is registered.
- User_activation_key – It’s OK to leave this field blank.
- User_status – You are required to leave this blank as “0”.
- Display_name – This is the name that is shown off. You can leave it the same as your nicename.
After filling out all information as needed, you should click “Go” button to confirm all settings. And then, you are asked to add values to a series of options included in the wp_usermeta table. This is where to enable the privileges to access to your WordPress admin for this newly created user account. Pitch on wp_usermeta table and access to its Insert tab.
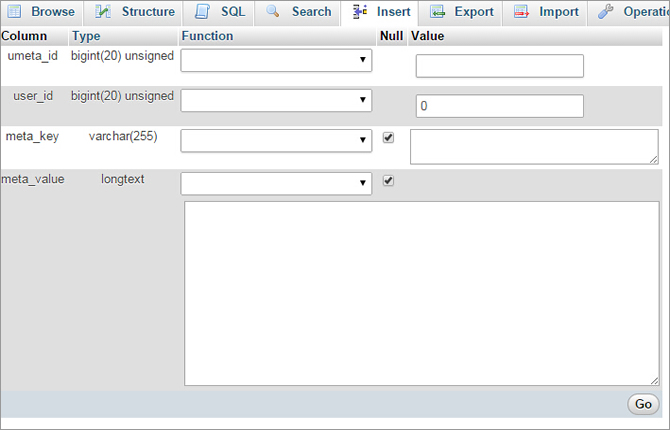
You need to fill out information in four fields, including umeta_id, user_id, meta_key and meta_value. Note that, there is no need to enter any information in umeta_id field because it will be generated automatically. Besides, the user_id should be the user that you have created in the wp_users table. Enter the values of wp_capabilities in “meta_key” while fill out a:1:{s:13:”administrator”;s:1:”1″;} in the meta_value option. Likewise, click “Go” button to confirm all information.
To check if you have created your admin user successfully, you can log into your WordPress dashboard with the new username and password. If the login information comes into effect immediately, you have done a good job.
Related Posts
 How to Reset WordPress Admin Password by Using phpMyAdmin
 Tips on How to Change WordPress Username and Password
 How to Create a Database for Your New Site?
 How to Use phpMyAdmin to Backup Database
 How to Install WordPress Manually?
 How to Export and Import a Database Using phpMyAdmin
 Beginner’s Guide to WordPress Multisite Domain Mapping
 How to Set up a Forum Using Joomla?